The Mailer lets you send custom broadcast emails to users in your workspace, for example, announcements, policy updates, or onboarding follow-ups. It uses your workspace's existing SMTP configuration to deliver the messages, and supports targeting specific users with a query and personalizing content with placeholders.
The Mailer is for one-off broadcast emails you compose yourself. Transactional emails (password resets, verification, login notifications) are handled separately through email templates.
Before you begin
Make sure your workspace's SMTP settings are configured. The Mailer relies on SMTP to deliver every email it sends.
Send a broadcast email
To open the Mailer, go to Manage → Workspace → Mailer.
Fill in the following fields. Required fields are marked with an asterisk (*).
Field | Description |
|---|---|
From* | The sender address shown in the recipient's inbox, for example:
|
Dry run | When enabled, the email is sent only to the From address (which must belong to a valid user) so you can preview how it looks. Disable this to send the email to all targeted users. |
Query | Optional MongoDB-style filter to target specific users. When empty, all workspace users receive the email. Unsubscribed users are automatically excluded. The value must be valid JSON, see Targeting users with Query below |
Subject* | The email subject line. |
Email body* | The HTML body of the email. Must include the |
Click Send email to deliver the message.
Targeting users with Query
By default, every workspace user receives the email. Use Query to narrow the recipient list with a MongoDB-style JSON filter against the user collection.
For example, to email only users created after January 1, 2015:
{"createdAt":{"$gt":{"$date":"2015-01-01T00:00:00.000Z"}}}Unsubscribed users are automatically removed from any query result.
Email body placeholders
The body accepts HTML and the following placeholders:
Placeholder | Description |
|---|---|
| Required. Renders the unsubscribe link. Every email must include it. |
| The recipient's full name. |
| The recipient's first name. |
| The recipient's last name. |
| The recipient's email address. |
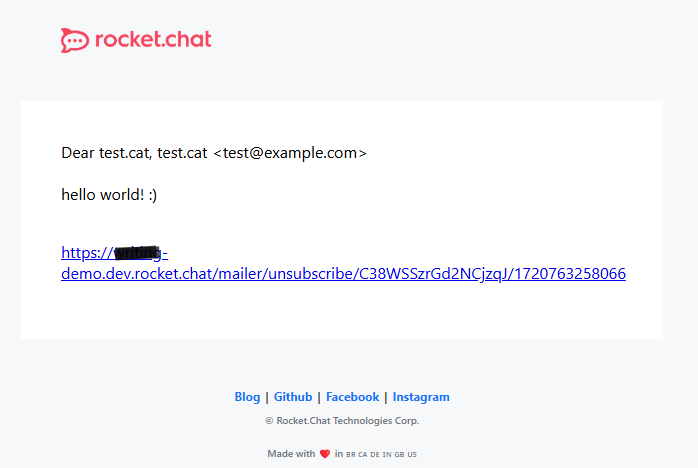
Example body:
<p>Dear [name],</p>

<p>Hello world! :)</p>

<p><a href="[Site_URL]">[unsubscribe]</a></p>
Example email receipts see: