Rocket.Chat’s SAML configuration can be integrated with Microsoft Azure Entra ID SAML identity provider. If your organization uses Microsoft Entra ID for employee identity verification, management, and access, you can map your Entra ID users to your Rocket.Chat workspace. This helps you streamline user identity management.
This document walks you through an example to integrate Entra ID with Rocket.Chat.
Prerequisites
A Microsoft Azure Entra ID tenant containing users and groups according to your needs. Refer to the Microsoft Entra ID documentation for details.
A Rocket.Chat workspace with admin access.
Add an enterprise application
Log in to your Azure portal account and access your Entra ID tenant. Follow these steps to create an enterprise application:
Go to Manage > Enterprise applications. On the All applications page, click New application.
On the Browse Microsoft Entra Gallery page, search for Microsoft Entra SAML Toolkit.
In the side pane that opens, enter a new name for your enterprise application, for example,
Rocket.Chat SAML.Click Create.
Your enterprise application will be created. For further details, you can refer to the Microsoft enterprise application quickstart guide.
Tip: Add your users or groups to this application from Manage > Users and groups. Doing this provides the SAML application with access to the users in the groups, so these users can sign in to Rocket.Chat once the configuration is complete.
Connect the enterprise application to the workspace
Once the application is created, we will connect it to the Rocket.Chat workspace. Follow these steps:
In the newly created enterprise application, go to Manage > Single sign-on. On this page, you can find the configuration properties. We will connect this application to the Rocket.Chat workspace.
In your workspace, go to Manage
 > Workspace > Settings > SAML.
Enter a name for the connection in the Custom Provider field, for example,
entra.In the Custom Entry Point field, copy and paste the value from the enterprise application’s Login URL. For example,
https://login.microsoftonline.com/6024a0e7-xxxx-xxxx-xxxx-335414008b76/saml2In the IDP SLO Redirect URL field, copy and paste the value from the enterprise application’s Logout URL. For example,
https://login.microsoftonline.com/6024a0e7-xxxx-xxxx-xxxx-335414008b76/saml2
The following screenshot shows the enterprise application on the left and the workspace settings on the right:
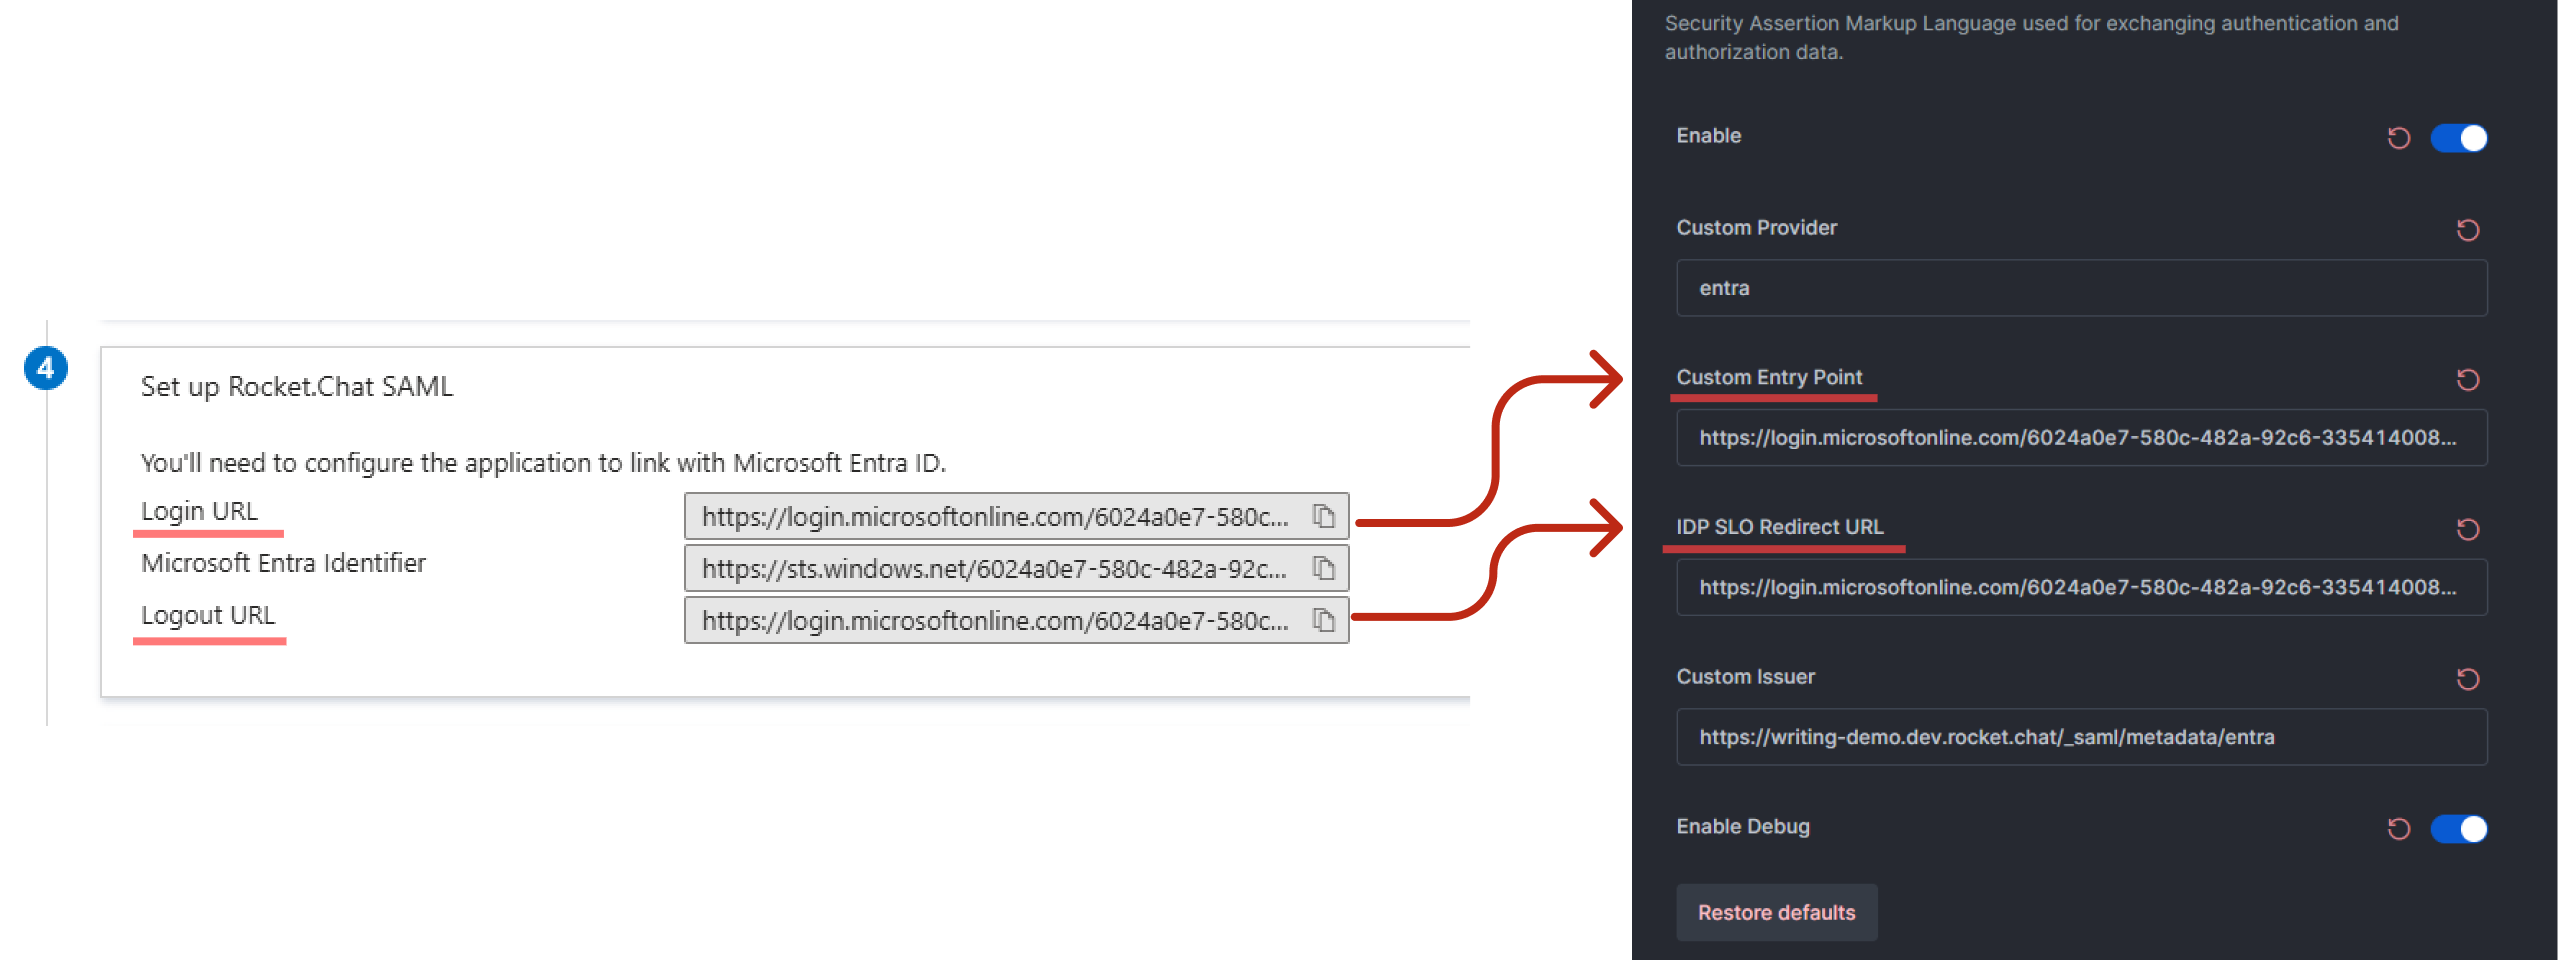
The screenshot also shows an example value for the Custom Issuer field in the workspace. The format of the value is
https://<your-rocket-chat-domain>/_saml/metadata/<custom-provider-name>. Replace the domain with your Rocket.Chat workspace domain name and the Custom Provider value at the end. For example,https://demo.rocket.chat/_saml/metadata/entraYou can use the Enable Debug option to get debugging information in the workspace logs.
Configure SAML single sign-on in the enterprise application
Now we will configure SAML single sign-on in the Entra ID enterprise application. Follow these steps:
From your Rocket.Chat workspace’s SAML settings, copy the Custom Issuer URL, and paste it in a new browser tab. The XML metadata file is displayed. We will use values from here to configure the Entra ID application. For example, it looks something like this based on your configuration:
<?xml version="1.0"?>
<EntityDescriptor xmlns:xsi="http://www.w3.org/2001/XMLSchema-instance" xsi:schemaLocation="urn:oasis:names:tc:SAML:2.0:metadata https://docs.oasis-open.org/security/saml/v2.0/saml-schema-metadata-2.0.xsd" xmlns="urn:oasis:names:tc:SAML:2.0:metadata" xmlns:ds="http://www.w3.org/2000/09/xmldsig#" entityID="https://demo.dev.rocket.chat/_saml/metadata/entra">
<SPSSODescriptor protocolSupportEnumeration="urn:oasis:names:tc:SAML:2.0:protocol">
<SingleLogoutService Binding="urn:oasis:names:tc:SAML:2.0:bindings:HTTP-Redirect" Location="https://demo.dev.rocket.chat/_saml/logout/entra/" ResponseLocation="https://demo.dev.rocket.chat/_saml/logout/entra/"/>
<NameIDFormat>urn:oasis:names:tc:SAML:1.1:nameid-format:emailAddress</NameIDFormat>
<AssertionConsumerService index="1" isDefault="true" Binding="urn:oasis:names:tc:SAML:2.0:bindings:HTTP-POST" Location="https://demo.dev.rocket.chat/_saml/validate/entra"/>
</SPSSODescriptor>
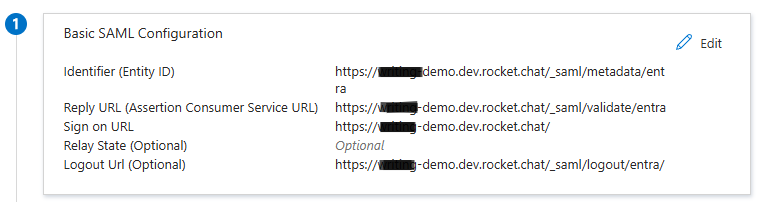
</EntityDescriptor>In your Entra ID enterprise application, click Edit next to Basic SAML Configuration.
In the Identifier (Entity ID) field, copy and paste the entityID URL from the metadata file. For example,
https://demo.dev.rocket.chat/_saml/metadata/entraIn the Reply URL (Assertion Consumer Service URL) field, copy and paste the Location URL from the AssertionConsumerService property in the metadata file. For example,
https://demo.dev.rocket.chat/_saml/validate/entraIn the Sign on URL field, enter your workspace URL. For example,
https://demo.dev.rocket.chat/In the Logout Url field, copy and paste the Location URL from the SingleLogoutService property in the metadata file. For example,
https://demo.dev.rocket.chat/_saml/logout/entra/Click Save.
The following screenshot shows an example of the SAML configuration values:
For further details, you can refer to the Microsoft SAML single sign-on guide for enterprise applications.
Modify attributes and claims
Rocket.Chat needs to receive SAML tokens (or claims) to sign in users from Entra ID. In this step, we will modify the attributes and claims that can be received by Rocket.Chat. Keep in mind that the following steps provide an example for the setup. Your organization’s configurations may differ, and you can modify the values according to your needs.
Click Edit next to Attributes & Claims.
Under Additional Claims, click the claim name with Value as user.mail.
For this claim, remove the Namespace URL value.
Leave the Name value as emailaddress. We will use this value later to map it to Rocket.Chat.
For the Source attribute field, select user.userprincipalname from the drop-down menu. This means that the value from users’ User principal name property will be used as their email addresses in Rocket.Chat. You can change this source value according to your configurations.
Click Save.
We need a value for users’ display names. For this, we will create a new claim. On the Attributes & Claims page, click Add new claim.
Enter the Name as displayname.
For the Source attribute field, select user.displayname from the drop-down menu. This means that the value from users’ Display name property will be used as their display names in Rocket.Chat. You can change this source value according to your configurations.
Click Save.
Your Attributes & Claims section can look something like this:
.png)
For further details, you can refer to Microsoft’s guide on SAML token claims customization.
Map claims to the workspace
In the previous step, we created and modified the necessary claims in the Entra ID SAML application. Now, follow these steps to map the claims to the Rocket.Chat workspace:
In the Rocket.Chat workspace, go to the SAML settings page. In the General tab, click to expand the Mapping section.
We will enter a JSON object as the value for User Data Field Map as follows:
{
  "email":"emailaddress",
  "name": "displayname" // the values are the claim names that we defined in the Entra SAML application in the previous step
  "username":{
               "fieldName": "emailaddress",
               "regex": "(.*)@.+$",
               "template": "__regex__"}, // this object splits the `emailaddress` claim; then it takes the part before the @ symbol as the username. For example, if the email address in Entra ID is `jane.doe@example.com`, then the username in Rocket.Chat will be `jane.doe`
}
According to your configurations, the claim names may differ. Check the Attributes & Claims section in your Entra ID SAML application for the correct values. The available fields in Rocket.Chat are name, email, and username, everything else will be discarded.
SAML verification certificates
If you want to enable signed authentication requests for the SAML application, follow these steps:
Generate your own private key and TLS certificate. Skip this step if you have your own public certificate and private key.
In the command-line tool of your choice, enter the command to generate a private key:
openssl genrsa -out sp-private.key 2048Optionally, you can generate a certificate signing request using the command:
openssl req -sha256 -new -key sp-private.key -out sp.csr. You are prompted to enter details such as your country, state, organization, and email address. Enter the details according to your needs.Generate a self-signed certificate valid for 10 years using the command:
openssl x509 -req -sha256 -days 3650 -in sp.csr -signkey sp-private.key -out sp-cert.crtConvert the certificate file to a
.cerfile as Entra ID only accepts the.cerfile format. Use the command:openssl x509 -outform DER -in sp-cert.crt -out sp-cert.cer
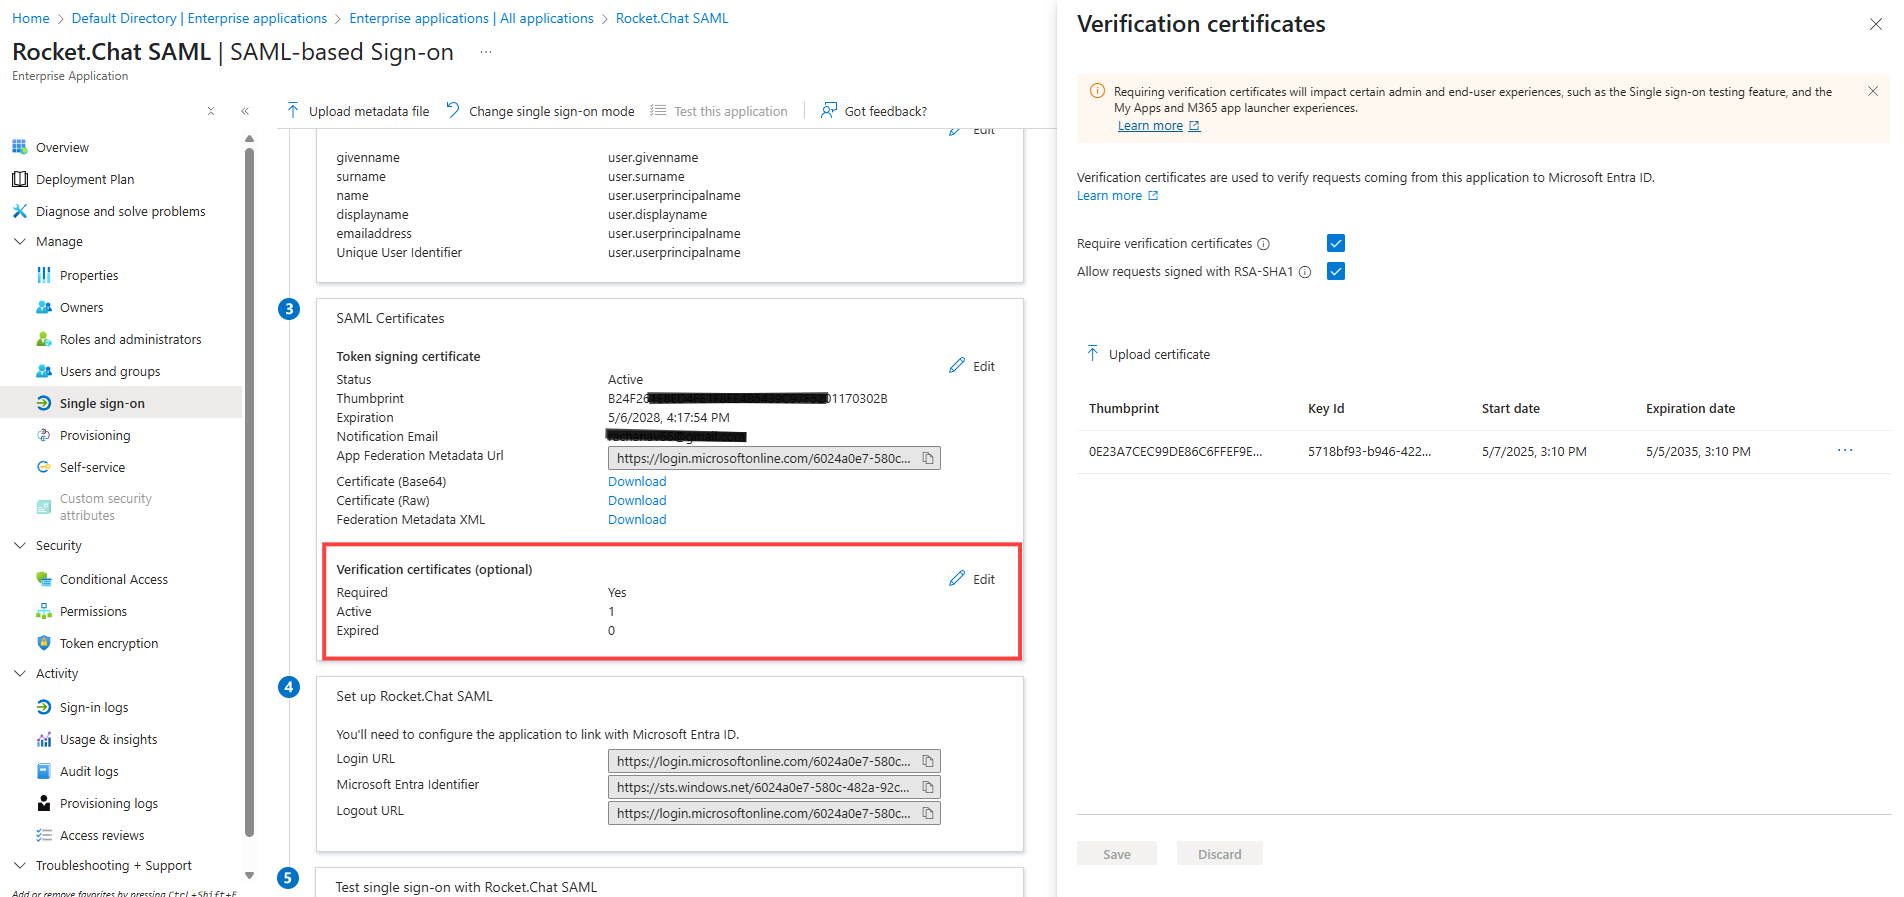
Now that our certificates are ready, we will enable secure SAML authentication. In the Entra ID SAML application, go to the SAML Certificates section on the SAML-based Sign-on page.
Click Edit next to Verification certificates (optional).
Enable the Require verification certificates and Allow requests signed with RSA-SHA1 checkboxes. Enabling the second checkbox is required because Rocket.Chat currently signs all SAML requests using the
RSA-SHA1algorithm.Click Upload certificate. Upload your
.cerpublic certificate file. In this example, it will be thesp-cert.cerfile.Click Save.
The following screenshot shows an example of the application:
For further information, you can refer to the Microsoft guide on enforcing signed SAML authentication requests.
Provide certificates in the workspace
Next, we will need to copy and paste the corresponding certificates to the Rocket.Chat workspace. Follow these steps:
In your Rocket.Chat workspace, go to the SAML settings page.
On the Connection tab, click to expand the Certificate section.
Copy the public certificate file content (in this example,
sp-cert.crtfile) and paste it in the Public Cert Contents field.Copy the private key file content (in this example,
sp-private.keyfile) and paste it in the Private Key Contents field.Select the Signature Validation Type field as Validate Either Signature.
Click Save changes.
The following screenshot shows an example of the Certificate section:
.png)
Set workspace’s user interface and behavior
Rocket.Chat provides settings to define the user login and logout behavior. In the workspace, go to the SAML settings and select the General tab.
In the User Interface section, you can change the login Button Text that is displayed on the workspace’s login page. For example,
Login with Entra ID SAML. Additionally, you can change the colors according to your needs.In the Behavior section, you can define how users’ details are managed and the logout behavior. See the SAML Configuration - General document for details.
Great! Our Entra ID SAML configuration with Rocket.Chat is now complete, and you can test the connection.
Test the Entra ID SAML setup
If you want to test the configuration, you can use a dummy user. Create a test user profile in your Entra ID tenant and set the properties according to your needs. Then access your Rocket.Chat workspace URL in any browser. Click the SAML login button below the username and password fields. You will be redirected to Microsoft’s authentication screen. You should be able to log in with the test user's credentials.
Alternatively, you can sign in to office.com with the test user’s credentials. After that, access the Rocket.Chat workspace URL in a new tab. You will be logged in automatically. Based on your organization’s requirements, users may need to verify their identity while logging in using an authenticator app, such as Microsoft Authenticator.
Troubleshooting
The configured SAML connection blocks unassigned users from signing in to Rocket.Chat. They may see an error as shown in the following screenshot:
.png)
Ensure that the users are assigned to the Entra ID SAML enterprise application that you created. To do this, go to the SAML application page and access Manage > Users and groups. On this page, add the groups or users of your organization who will access the Rocket.Chat workspace.
If users are unable to sign in to Rocket.Chat, check your Mapping section in the workspace’s SAML settings and the Attributes & Claims section in the Entra ID application. Make sure that the values are mapped correctly.
For further information, you can also check the Reports tab to view the workspace logs.