Keycloak is an open-source identity and access management software. It supports user federation, OAuth, SAML, and OpenID Connect protocols. Along with role-based authorization, you can also connect to existing LDAP user directories. Rocket.Chat supports Keycloak configuration to securely manage your users and resources.
This guide walks you through a basic Keycloak OpenID Connect setup in Rocket.Chat to log in with Keycloak credentials.
Prerequisites
A Rocket.Chat workspace (e.g.,
https://test-rocket.chat).A Keycloak server (e.g.,
https://keycloak.test.com).A Keycloak realm set up for use (e.g.,
master). This guide references the realm using the placeholder<realm>.
Configure OpenID Connect client on Keycloak
A Keycloak client manages authentication between users on your Keycloak server and the Rocket.Chat workspace. This client securely handles the exchange of user information, allowing users to log in to Rocket.Chat using their Keycloak credentials.
To configure the client in Keycloak:
Navigate to the Clients section in your Keycloak server.
Click Create Client.
Set OpenID Connect as the client type.
Enter a Client ID (e.g.,
rocket-chat-client).Click Next to proceed to Compatibility Config and enable Client Authentication, which sets the client to the confidential access type.
Click Next to go to Login Settings and enter the Valid Redirect URIs (e.g.,
https://<workspace-url>/*).Click Save to create the new client. After saving, you can access the Credentials tab where you’ll find the client secret required for configuring Rocket.Chat.
Configure Keycloak in Rocket.Chat
Log in to Rocket.Chat as an administrator and navigate to Manage
 > Settings > OAuth.
Click Add Custom OAuth and assign a unique name.
Refresh the OAuth settings page and select the newly created custom OAuth.
Enable the new custom OAuth and enter the following details:
Field | Description | Example |
|---|---|---|
URL | The OpenID Connect issuer URL for the Keycloak realm. Navigate to Realm Settings > General > Endpoints in your Keycloak server, and click OpenID Endpoint Configuration. The URL is required in the following format:
|
|
Token Path | The token endpoint is used to obtain access tokens. Enter the path from the token endpoint. |
|
Token sent via | Select whether the token is sent via |
|
Identity Token Sent Via | Select whether the identity token is sent via |
|
Identity Path | The user information endpoint is used to retrieve user data. Enter the path from the user endpoint. |
|
Authorize Path | Enter the path from the authorization endpoint. |
|
Scope | The scope defines the user access level and permissions that you have configured in Keycloak. |
|
Param Name for access token | The name of the access token. |
|
Id | The client ID that you created in Keycloak. |
|
Secret | Enter the client secret from your Keycloak client's Credentials tab. |
|
Button Text | Enter the text to be displayed on the login screen. |
|
Leave the remaining configurations as default, then click Save Changes and Refresh OAuth Services.
In test environments without an SMTP server, disable two-factor authentication under Manage
> Settings > General.
Your workspace's login page now displays a Login with Keycloak button. Users can log in with their Keycloak credentials!
For more information on Keycloak server setup and roles, see Server Administration Guide.
Authenticating Keycloak users to Rocket.Chat via OpenID connect
When users visit your workspace login page, they can now click the Login with Keycloak button. This action will redirect them to Keycloak’s authentication page, where they can log in with their Keycloak credentials. Upon successful login, users are redirected back to their account on the workspace. You can monitor active sessions of your Keycloak users on Rocket.Chat by checking the Sessions tab in Keycloak.
Creating users in Keycloak
If you don’t have users set up in Keycloak yet, follow these basic steps to create a new user:
Navigate to the Users section in Keycloak and click Create User.
Fill in the required fields, then click Create.
Go to the user's Credentials tab and set a password.
You can also configure the user interface, behavior, and mapping settings according to your requirements.
Advanced configuration
In this section, you’ll learn about some advanced configuration options to map and sync your user data between Rocket.Chat and Keycloak.
The configurations highlighted in this guide are examples. Channel and role synchronization will work with any list of values included in the Keycloak payload, as long as it is configured accordingly.
Map Keycloak groups to Rocket.Chat rooms
With Keycloak, users who belong to the same group can be automatically added to corresponding Rocket.Chat rooms upon login. This guide outlines the process of mapping users in Keycloak groups to Rocket.Chat rooms.
Step 1: Configure Groups in Keycloak
If you do not already have a group set up in Keycloak, follow these steps to create one:
Navigate to your Keycloak server and go to Groups.
Click Create Group to create a new group. For example, you can name it Managers.
After creating the group, go to the Members tab to add users, or alternatively, you can add users to the group during the user creation process.
Next, navigate to Client Scopes on your Keycloak server and create a new client scope named groups.

In the groups client scope, go to Mappers > Add Mapper > By Configuration > Group Membership.
Fill in the required details for the group membership, using the name groups as shown below, and then click Save.

Return to Clients in Keycloak and select the client you are using for your Rocket.Chat workspace. Navigate to the Client Scopes tab for the client, then click Add Client Scope. Select the client scope for the group you just created (in this example, groups).
With these steps completed, the Keycloak group has been successfully configured for your client. The next step is to map this group to a Rocket.Chat room.
Step 2: Map Keycloak groups to Rocket.Chat rooms
In your Rocket.Chat workspace, navigate to Manage
> Settings > OAuth, and select your CustomOAuth.Update the following fields:
Field
Description
Example
Roles/Groups field for channel mapping
Enter the name of the Keycloak group(s) to be synced with Rocket.Chat rooms.
groupsMap Roles/Groups to channels
Enable this option to sync Keycloak groups with Rocket.Chat rooms.
Enabled
OAuth Group Channel Map
Enter the mapping between groups and rooms in JSON format. Users in the specified Keycloak group will be added to the corresponding Rocket.Chat rooms.
{
    "Managers": "managers-channel"
}
The following screenshot shows the example:

Click Save changes to apply these updates.
Once the configuration is complete, users who belong to the Managers group in Keycloak will be automatically added to the managers-channel in Rocket.Chat upon login. If the designated rooms do not already exist, Rocket.Chat will create them as public rooms when a user from the Keycloak group logs in.
Merge and sync roles from Keycloak to Rocket.Chat
By default, Keycloak doesn't include user roles in the user payload. To properly control access and sync user roles in Rocket.Chat, you'll need to configure Keycloak to include these roles in the user info payload. Then, you'll configure Rocket.Chat to recognize and use them.
Step 1: Configure Keycloak to include roles in user payload
If your Keycloak user info doesn’t include roles by default, you’ll need to expose them manually:
Go to Client Scopes in Keycloak and create a new one.
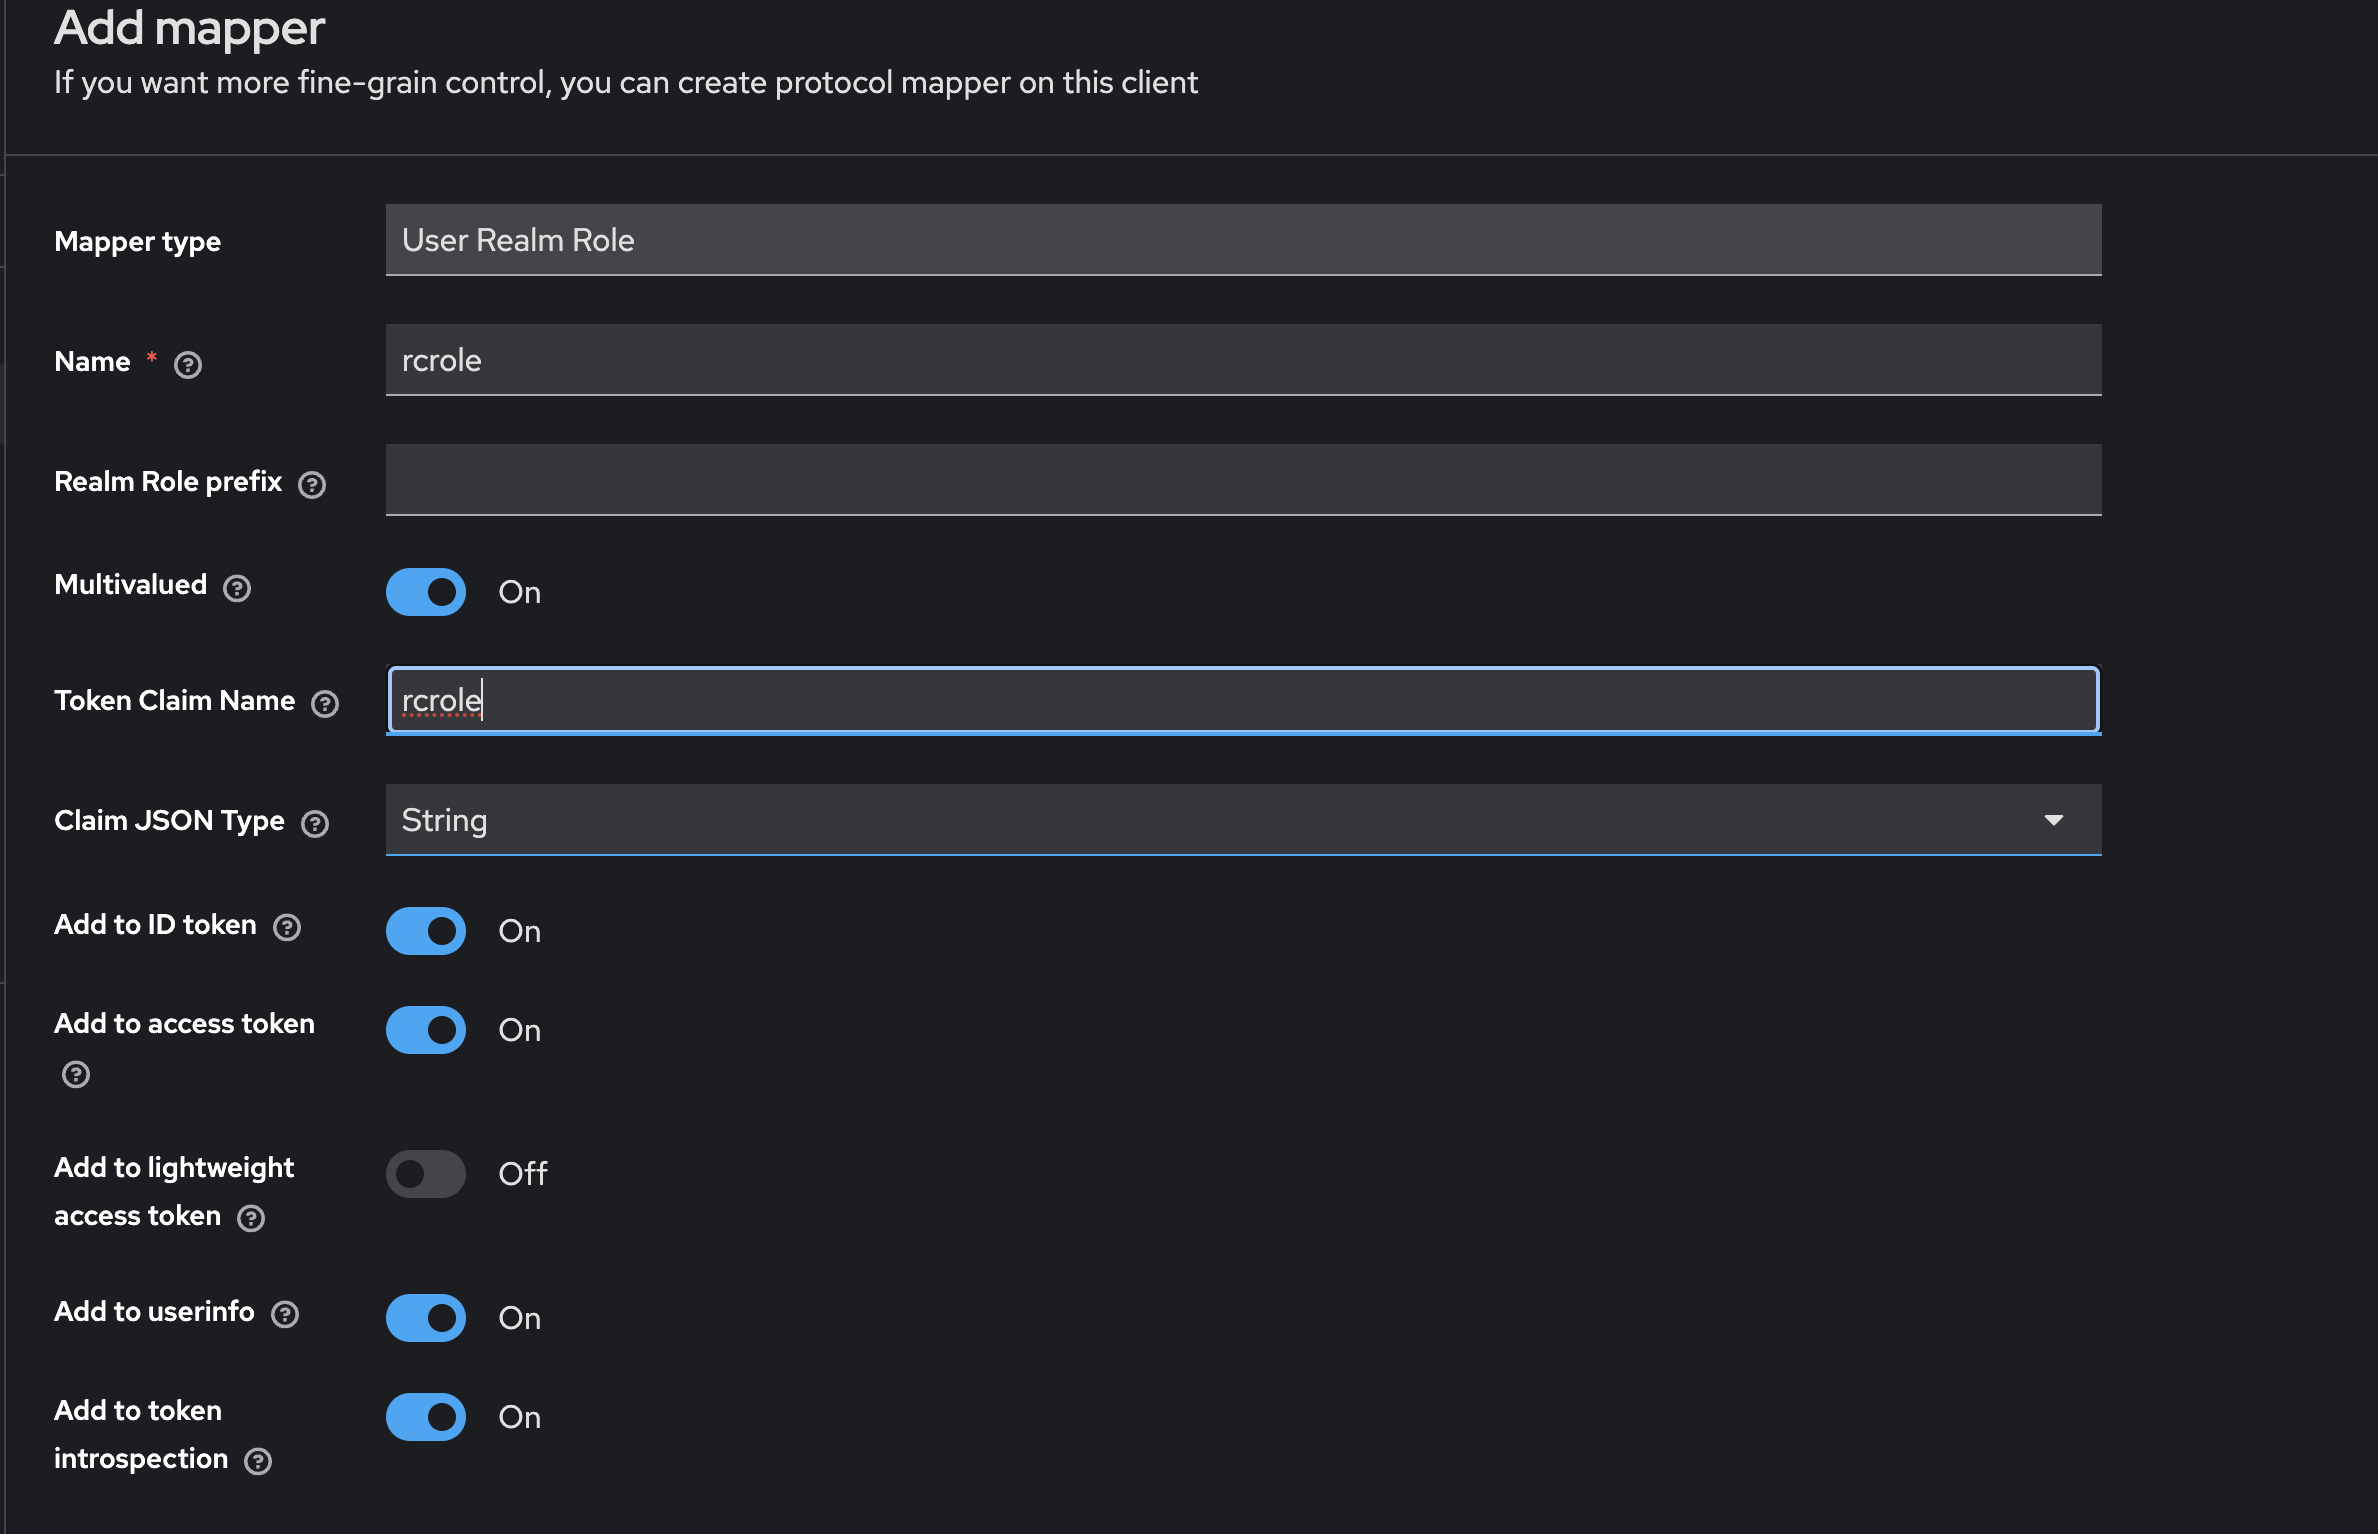
In the newly created client scope, navigate to Mapper > Configure a new Mapper > User Realm Role. Fill in the required details for the mapper and add a Token Claim Name. Enable the Add to access token and Add to user info option. Click Save to apply these changes.
Go to Realm Roles and create a new role. Add the Role name and click Save.
Navigate to a user and switch to the Role mapping tab. Click Assign role and proceed to Filter by realm roles. Select the new role you created and assign it to the user.
Go back to Clients and select your Rocket.Chat client. Navigate to the Client scopes tab and add the new client scope as default.
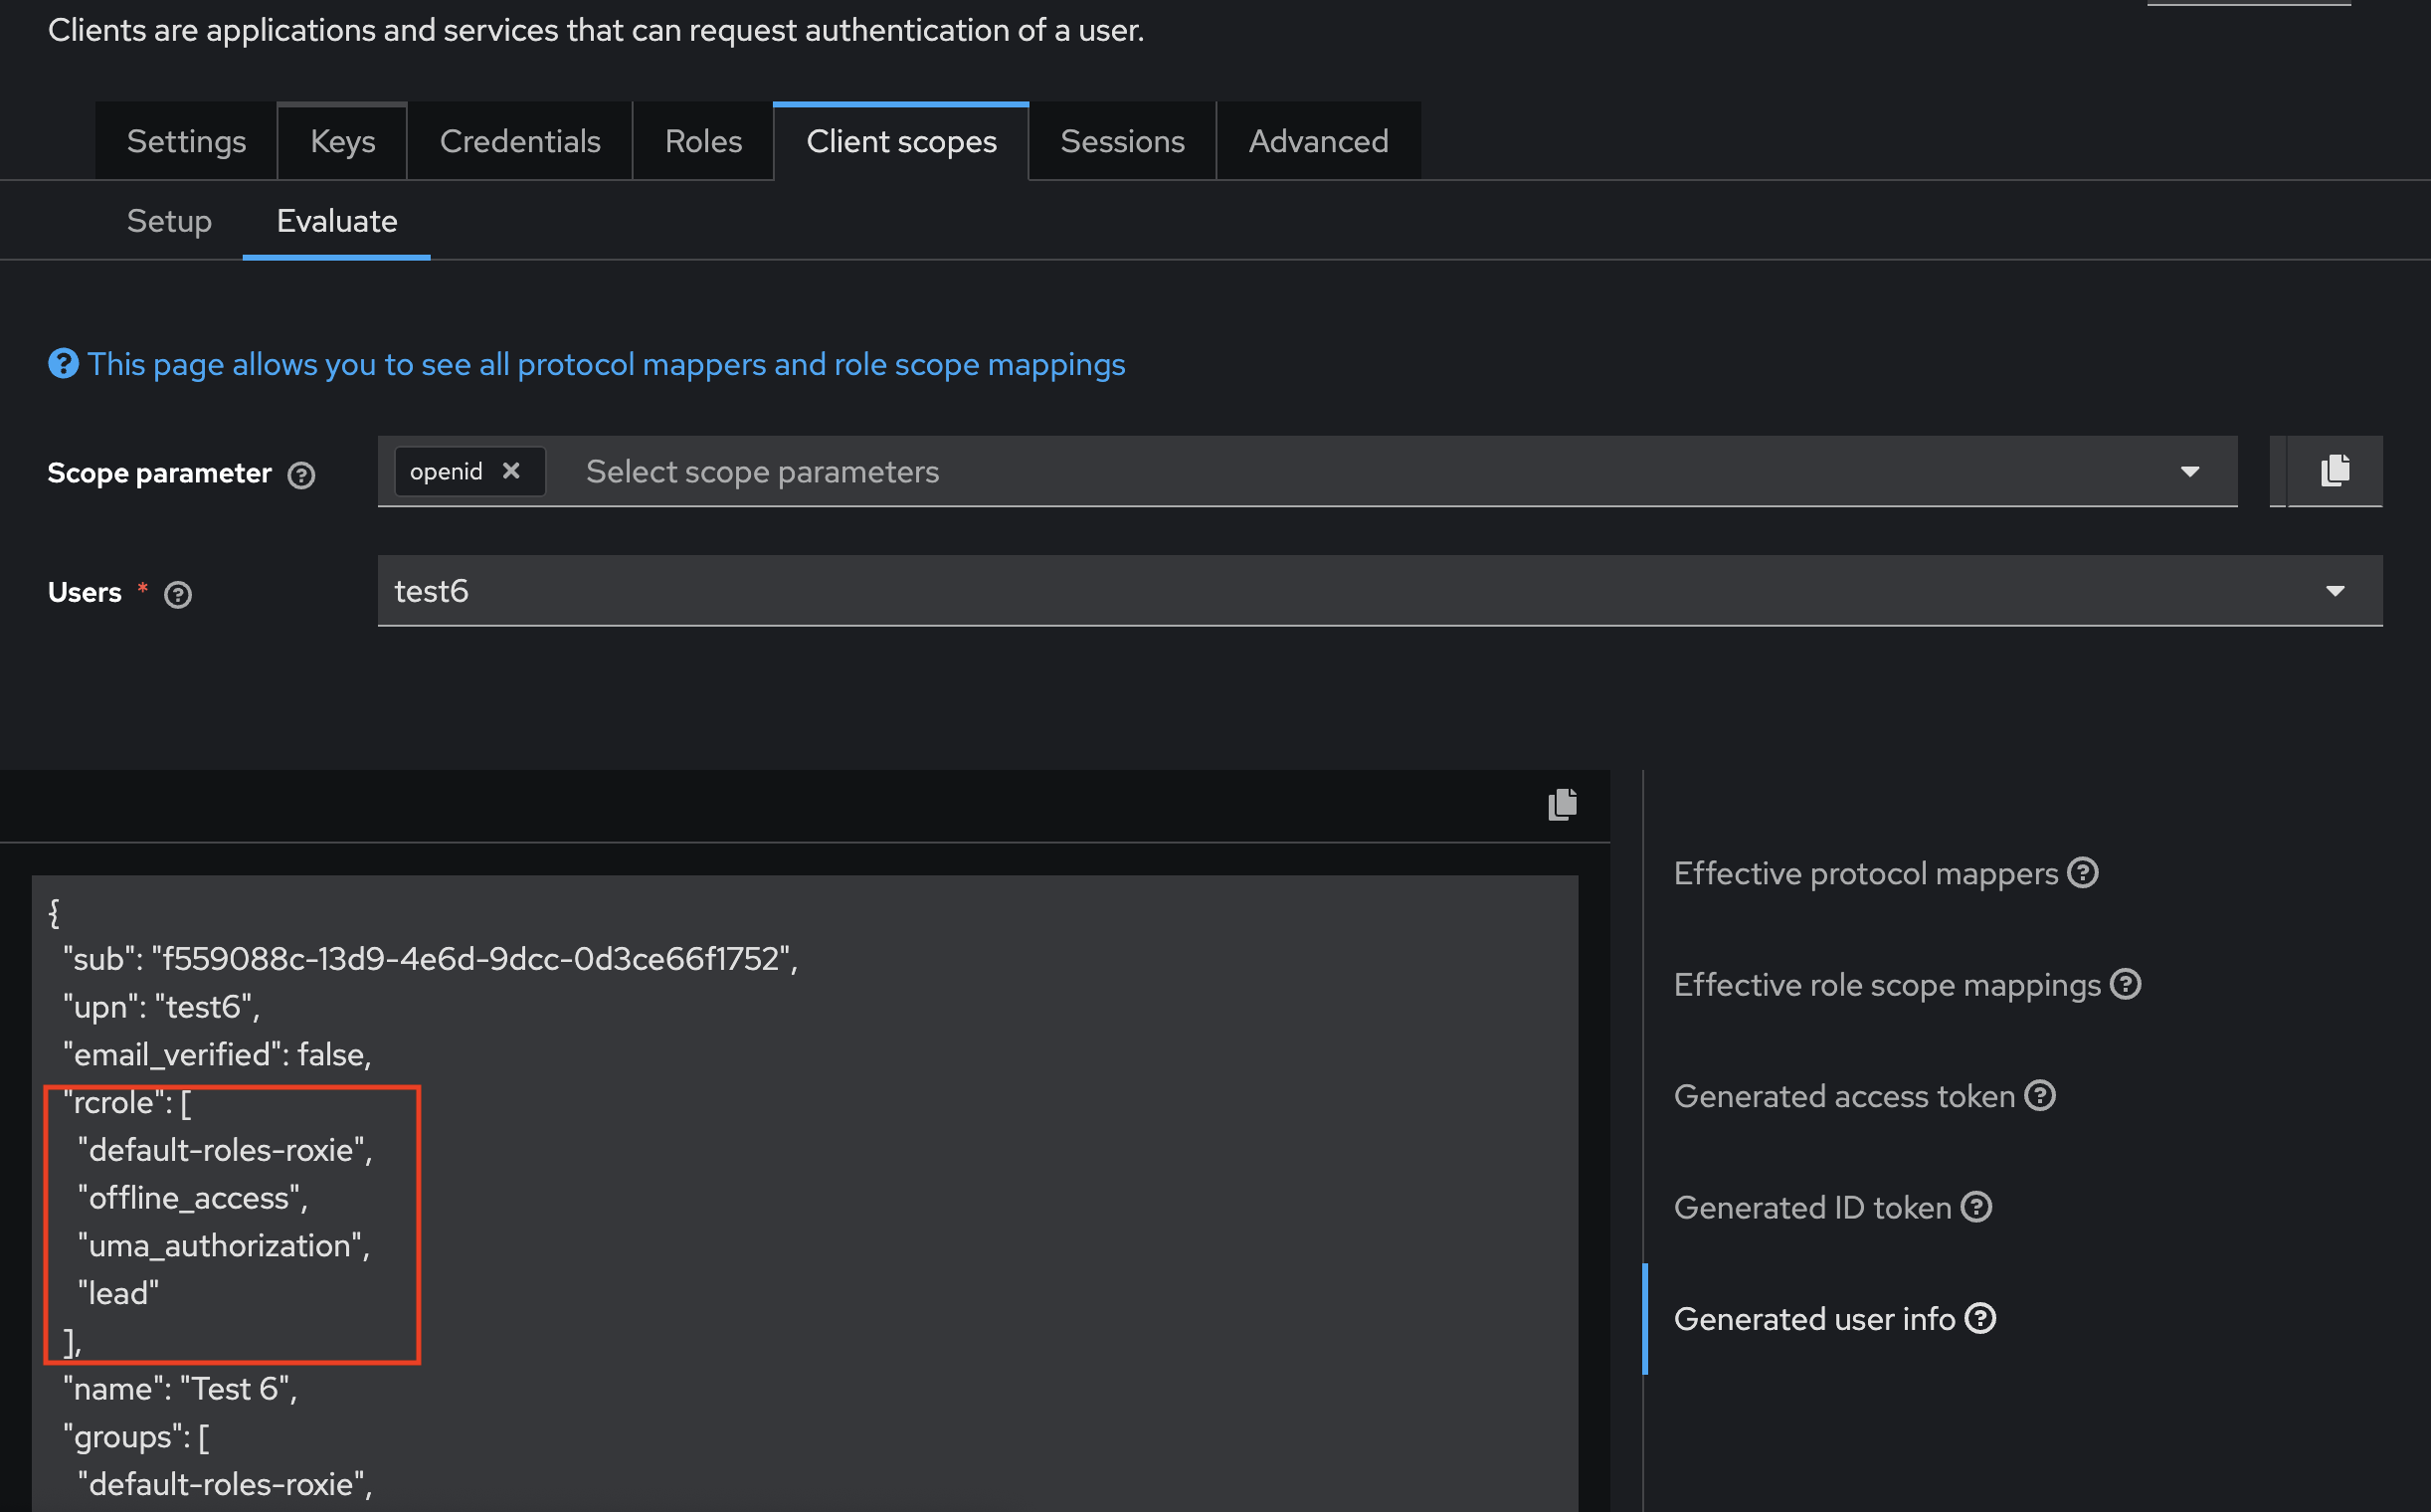
Go to the Evaluate tab. Select the user and click Generate user info to confirm that the user info payload includes the role you assigned under the Token claim name you set.
Step 2: Sync roles from Keycloak to Rocket.Chat
Now that roles are included in the payload, next step is to configure the roles to be synced in Rocket.Chat.
In your Rocket.Chat workspace, navigate to Manage
> Settings > OAuth, and select your CustomOAuth.Update the following fields:
Field | Description | Example |
|---|---|---|
Roles/Groups field name | Set this field to match the |
|
Merge Roles from SSO | Enable this option to sync Keycloak roles with Rocket.Chat. It merges and mirrors the Keycloak user roles in the Rocket.Chat workspace. If you add or remove roles in Keycloak, this is replicated in Rocket.Chat. | |
Roles to Sync | List the Keycloak role names you want to sync on every new user login. Make sure matching roles exist in Rocket.Chat (same name, case-sensitive) for this to work successfully. |
|
Click Save changes to apply these updates.
The next time the user logs in to your workspace, their role will be synced from Keycloak and automatically assigned in Rocket.Chat.