.svg)
Running Rocket.Chat with multiple instances allows your workspace to handle more users and distribute traffic more effectively. In a multi-instance architecture, several Rocket.Chat instances run concurrently, connecting to a shared MongoDB replica set and load-balanced through a reverse proxy.
This guide explains how to deploy Rocket.Chat in a multi-instance setup using Docker. It walks through:
Deploying a shared MongoDB database and monitoring stack
Running multiple Rocket.Chat instances connected to the same backend services
Configuring Traefik to route and balance traffic across the Rocket.Chat instances
While horizontal scaling with multiple servers is best for high availability, you can also scale vertically by running multiple instances on a large single multi-core host computer. A common rule of thumb is to run N–1 Rocket.Chat instances, where N is the number of CPU cores.
Prerequisite
Before you begin, verify that you have the following:
Servers
One server for database (MongoDB) and monitoring (Prometheus and Grafana).
One server for Traefik (or your preferred reverse proxy).
Two or more servers for deploying Rocket.Chat instances as needed.
Docker and Git must be installed and operational on all servers.
A domain name that points to the Traefik server's IP address.
Ensure server firewall rules are configured to allow communication (traffic) between the MongoDB, Traefik, and Rocket.Chat servers.
This guide shows an example on how to run Rocket.Chat with two instances. Your actual prodecures may vary depending on your organization's requirements and configurations.
Step 1: Deploy MongoDB and monitoring stack
The first component of a multi-instance deployment is a shared database. All Rocket.Chat instances must connect to the same MongoDB replica set. The official Rocket.Chat Docker Compose configurationofficial Rocket.Chat Docker Compose configuration also includes a monitoring stack that exposes metrics to Prometheus and visualizes them in Grafana.
Go to your MongoDB server and follow these steps:
Create the directory structure for Prometheus's configuration:
mkdir -p files/prometheus/file_sd_configs.d/Create the Prometheus target file (
rocketchat.yaml) inside the new directory:nano files/prometheus/file_sd_configs.d/rocketchat.yamlSave the following contents to the
rocketchat.yamlfile:- targets: - <first-rocketchat-ip>:9458 - <second-rocketchat-ip>:9458 labels: job: rocketchat service: rocketchatThis file defines the specific IP addresses where Prometheus should look for Rocket.Chat's metrics.
Replace
<first-rocketchat-ip>and<second-rocketchat-ip>with the private IP addresses of your respective Rocket.Chat servers.If you have more Rocket.Chat instances, add the targets following the same format.
In your preferred directory, download the official compose files for database and monitoring:
curl -O https://raw.githubusercontent.com/RocketChat/rocketchat-compose/main/compose.monitoring.yml
curl -O https://raw.githubusercontent.com/RocketChat/rocketchat-compose/main/compose.database.yml
Create a
.envfile in the same directory and add the following variables:# MongoDB MONGODB_BIND_IP=<mongo-ip> MONGODB_PORT_NUMBER=27017 MONGODB_ADVERTISED_HOSTNAME=<mongo-ip> MONGODB_INITIAL_PRIMARY_HOST=<mongo-ip> # Nats NATS_PORT_NUMBER=4222 NATS_BIND_IP=<mongo-ip> # Grafana GRAFANA_DOMAIN= GRAFANA_PATH=/grafana GRAFANA_ADMIN_PASSWORD=rc-admin GRAFANA_HOST_PORT=5050Replace
<mongo-ip>with the private IP address of your MongoDB server.After deploying successfully, Grafana will be available at
https://<workspace-domain>/grafana. To expose Grafana on a subdomain instead, set:GRAFANA_DOMAIN=<grafana-subdomain> GRAFANA_PATH=Replace
<grafana-subdomain>with the subdomain name where you want to access Grafana.
Deploy MongoDB, Prometheus, and Grafana using the downloaded files:
docker compose -f compose.database.yml -f compose.monitoring.yml up -dThis starts MongoDB, Prometheus, and Grafana so the rest of the cluster can connect to them.
Step 2: Set up the Rocket.Chat servers
Go to each Rocket.Chat server and perform these steps:
Download the official Rocket.Chat Docker Compose file in your preferred directory:
curl -O https://raw.githubusercontent.com/RocketChat/rocketchat-compose/main/compose.ymlOpen
compose.yml. In the rocketchat service section, addnetwork_mode: host:services: rocketchat: ... network_mode: host labels: ...Using
network_mode: hostallows Rocket.Chat to bind directly to the host network. This simplifies communication with Traefik and avoids port-mapping conflicts when running multiple instances across servers.Create a
.envfile in the same directory with the following values:NATS_URL: Enables inter-instance communication (presence, notifications, etc).MONGO_URL: Points all Rocket.Chat instances to the same MongoDB replica set.RELEASE: The exact version of Rocket.Chat you wish to deploy. Refer to the Rocket.Chat releases page for a list of available stable versions.ROOT_URL: The complete URL your users will use to access the workspace, including the secure protocol (https://), for example, https://chat.example.com.
NATS_URL=monolith+nats://<mongo-ip>:4222
MONGO_URL=mongodb://<mongo-ip>:27017/rocketchat?replicaSet=rs0
RELEASE=<enter-rocketchat-release>
ROOT_URL=<enter-workspace-url>
Replace
<mongo-ip>with the private IP address of your MongoDB server. Set theRELEASEandROOT_URLfor your workspace.Start the Rocket.Chat instance with this command:
docker compose up -d
Remember to repeat this step for all your Rocket.Chat servers.
Step 3: Set up Traefik
Traefik acts as the reverse proxy and load balancer. It sits at the network edge, receive all incoming web traffic, and distribute it evenly across your running Rocket.Chat instances to ensure even load and high availability.
Go to your Traefik server and continue with these steps:
Fetch the official Traefik Docker Compose file in your preferred directory:
curl -O https://raw.githubusercontent.com/RocketChat/rocketchat-compose/main/compose.traefik.ymlCreate a new
override-traefik.yamland save these contents:services: traefik-init: image: docker.io/alpine:latest entrypoint: sh command: - -c - |- set -e # quote 'eof' to prevent variable expansion rm -rf /traefik_config/* || true mkdir -p /traefik_config/http /traefik_config/https cat <<'EOF' | tee /traefik_config/http/dynamic.yml http: routers: rocketchat: entryPoints: - http service: rocketchat rule: Host(`{{ env "DOMAIN" }}`) && PathPrefix(`/`) grafana: entryPoints: - http service: grafana rule: |- {{ if eq (env "GRAFANA_DOMAIN") "" }} Host(`{{ env "DOMAIN" }}`) && PathPrefix(`{{ env "GRAFANA_PATH" }}`) {{ else }} Host(`{{ env "GRAFANA_DOMAIN" }}`) {{ end }} services: rocketchat: loadBalancer: servers: - url: "http://<first-rocketchat-ip>:3000" - url: "http://<second-rocketchat-ip>:3000" grafana: loadBalancer: servers: - url: "http://<mongo-ip>:5050" EOF cat <<'EOF' | tee /traefik_config/https/dynamic.yml https: address: ":443" http: redirections: entryPoint: to: "http" scheme: "https" http: routers: rocketchat: entryPoints: - https service: rocketchat rule: Host(`{{ env "DOMAIN" }}`) tls: certResolver: le grafana: entryPoints: - https rule: | {{ if eq (env "GRAFANA_DOMAIN") "" }} Host(`{{ env "DOMAIN" }}`) && PathPrefix(`{{ env "GRAFANA_PATH" }}`) {{ else }} Host(`{{ env "GRAFANA_DOMAIN" }}`) {{ end }} service: grafana tls: certResolver: le services: rocketchat: loadBalancer: servers: - url: "http://<first-rocketchat-ip>:3000" - url: "http://<second-rocketchat-ip>:3000" grafana: loadBalancer: servers: - url: "http://<mongo-ip>:5050" EOF echo "files generated, keeping container alive to podman-compose detect it" tail -f /dev/null volumes: - traefik_config:/traefik_config:z restart: "no"Replace
<mongo-ip>with the private IP address of your MongoDB server.Replace
<first-rocketchat-ip>with the IP address of your first Rocket.chatserver.Replace
<second-rocketchat-ip>with the IP address of the second Rocket.Chat server.If you have more Rocket.Chat instances, add them to all the
serverslist underrocketchat.loadBalancer.
Create a
.envfile to set environment variables for Traefik, including your domain name and email for Let's Encrypt (which is used for automatic SSL/TLS certificates):DOMAIN=<domain-name> LETSENCRYPT_ENABLED=true LETSENCRYPT_EMAIL=<email-address> TRAEFIK_PROTOCOL=https # Grafana GRAFANA_DOMAIN= GRAFANA_PATH=/grafana GRAFANA_ADMIN_PASSWORD=rc-admin GRAFANA_HOST_PORT=5050 # Traefik ports TRAEFIK_HTTP_PORT=80 TRAEFIK_DASHBOARD_PORT=8080 TRAEFIK_HTTPS_PORT=443Replace
<domain-name>with your actual domain name (e.g.,chat.example.com).Replace
<email-address>with your email address for Let's Encrypt.
Launch Traefik with this command:
docker compose -f compose.traefik.yml -f override-traefik.yaml up -d
Step 4: Accessing Rocket.Chat
Once the Traefik server is running, the multi-instance deployment is complete!
Visit the workspace URL in your browser.
After the workspace loads, follow the on-screen prompts to create your first admin user and complete the initial workspace setup. Your workspace and email will be registered to the Rocket.Chat Cloud portal during this process.
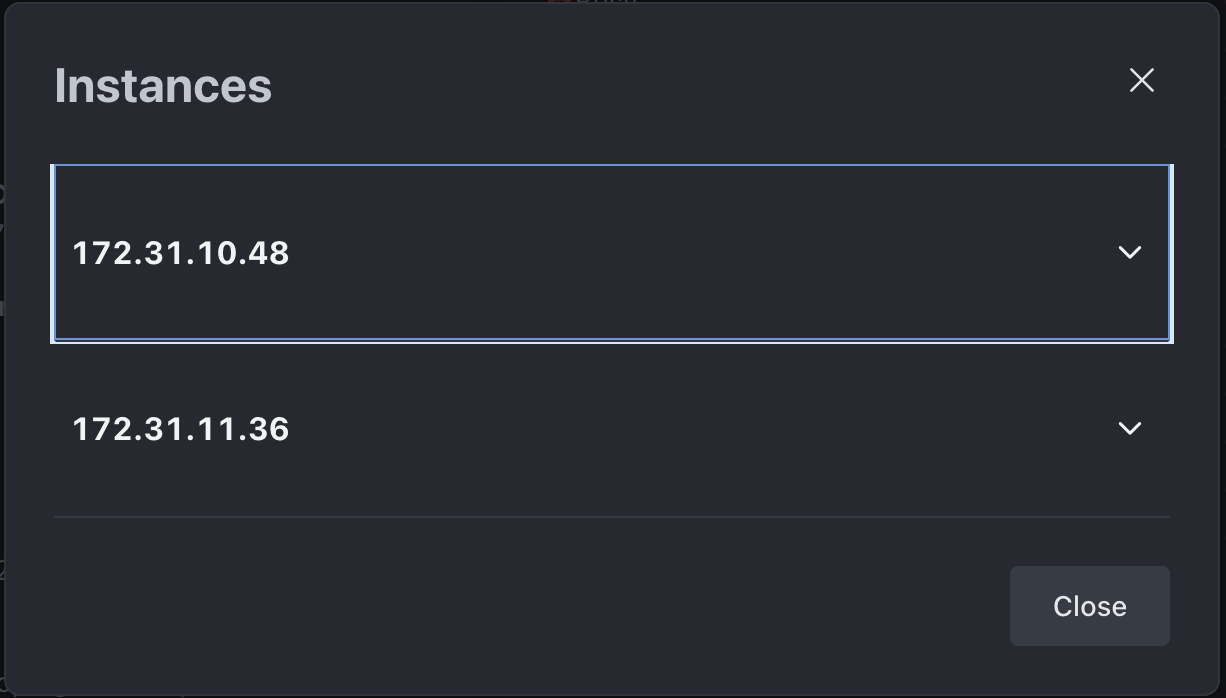
To confirm that all instances are connected and working correctly:
Navigate to Manage
 > Workspace.
Click the Instances button under the Deployment section.
All connected Rocket.Chat instances and their IP addresses will be listed here, confirming your multi-instance setup.
Access monitoring dashboard
You can access the Grafana dashboard at the path or subdomain you configured (e.g., https://your-domain.com/grafana or https://grafana.your-domain.com). To log in to your Grafana dashboard, use the following credentials:
User:
adminPassword: The password you set in the
GRAFANA_ADMIN_PASSWORDvariable in your.envfile.The
GRAFANA_ADMIN_PASSWORDyou set in the.envfile is only applied once during the first setup of the container. To update your password later, you must change it directly within your Grafana user preferences.
Step 5: Update file storage
Rocket.Chat stores file uploads in MongoDB GridFS by default. While this works without additional setup, it increases database load and limits scalability. For production multi-instance deployments, configure a dedicated object storage service such as Amazon S3, Google Cloud Storage (GCS), or MinIO. Refer to the File Uploads guide for detailed instructions on configuring your preferred file storage solution.
Next steps
You now have a multi-instance Rocket.Chat workspace running with Docker. Explore the following resources to continue:
User Guides: Learn the basics of your Rocket.Chat account, the types of rooms, and how to communicate with your workspace users.
Workspace Administration: Administrators and owners can set and manage various configurations.
Marketplace: Explore the available apps to enhance your workspace.
Update multi-instance Rocket.Chat workspace version
Before you proceed, consult the general guidelines for updating Rocket.Chat.
Check the MongoDB version requirements to ensure your current MongoDB version is compatible with the new Rocket.Chat version.
In a multi-instance setup, it is best practice to update instances one at a time (rolling update) to maintain workspace availability.
To update your Rocket.Chat version, continue with these steps in each Rocket.Chat server:
Open your
.envfile and update theRELEASEvariable to your desired version tag:RELEASE=<desired version>Run the following command to pull the new image and restart the Rocket.Chat container:
docker compose up -d
After a few minutes, you can navigate to Manage ![]() > Workspace and verify the new workspace version.
> Workspace and verify the new workspace version.
It’s important to always keep the connected Rocket.Chat instances on the same workspace version.
Additional configurations
Inter-instance communication (peer-to-peer)
For features like typing indicators and ephemeral events to work across the cluster, instances must be able to communicate directly with each other. In a Docker environment where host networking isn't used, configure the following variables:
INSTANCE_IP: This variable defines the IP address that is accessible by other Rocket.Chat instances. Set the variable to the current host IP address in all your.envfiles. Avoid using internal container IPs as they are not reachable across different hosts.TCP_PORT: By default, Rocket.Chat uses a random port for peer communication on each instance. If you are behind a firewall, define a fixed TCP_PORT (e.g., 3001) to ensure the correct port is opened and accessible.
Both INSTANCE_IP and TCP_PORT are stored in the instances' collection, where Rocket.Chat instances monitor and maintain connectivity. This internal registry allows each instance to discover new peers and establish TCP connections as new instances are added. If an instance fails to update its record, it will eventually expire and be removed from the registry, ensuring only active connections are maintained.
Verify your database
When using MongoDB Atlas or deploying a custom database, verify that your database is correctly configured as a critical part of the setup. Run MongoDB as a replica set, as replication ensures data redundancy and provides a secondary node if the primary node fails.
You have successfully scaled your Rocket.Chat workspace using multiple instances. By using a shared MongoDB replica set, NATS for inter-instance communication, and Traefik for load balancing, your workspace is now equipped to handle higher traffic volumes with improved fault tolerance.