
Launchpad is a command-line interface (CLI) that provides a quick, comprehensive solution to deploying Rocket.Chat with Kubernetes. Launchpad simplifies setup, configuration, ongoing operations, and data lifecycle. Teams can rely on it to deliver predictable and secure deployments in high-stakes environments.
What you can expect with this deployment method:
Automated setup: Quick and easy end-to-end deployment of Rocket.Chat workspaces in Kubernetes clusters. Unlike the other deployment methods, Launchpad verifies and manages your critical dependencies like your external MongoDB, ingress controllers, and certificates, so you don’t have to manage them one by one.
Operational visibility: Ready-to-use monitoring dashboards provide performance metrics that are aligned with service level objectives. Launchpad comes with a built-in monitoring stack using Prometheus and Grafana. Admins can track infrastructure and key performance metrics using the pre-configured dashboards.
This deployment method is for users who do not want to assemble or customize every part of the deployment stack and reflects best practices across networking, monitoring, and security. If you want more configuration flexibility, refer to the other deployment methods (Kubernetes, Docker, or Podman).
Currently, this deployment does not support Omnichannel, air-gapped, and federation workloads. If you want to deploy Rocket.Chat with these functionalities, use any of the other recommended deployment methods.
During this initial implementation phase, only the
smallsize configuration is available, which supports upto 500 workspace users.It is recommended that you first deploy in a test environment to verify that the workspace is deployed according to your needs.
Launchpad components
Here is an overview of the internal components that Launchpad uses to deploy workspaces:
Helm controller: Manages installing, upgrading/reconfiguring, and uninstalling Helm charts using a HelmChart Custom Resource Definition (CRD).
Monitoring Helm chart: Deploys a complete monitoring stack, including Prometheus Operator, Prometheus, Prometheus Exporters, Grafana, and pre-configured Grafana dashboards for Rocket.Chat.
Traefik: Traefik is a modern HTTP reverse proxy and load balancer made to easily deploy microservices.
Cert-manager: This operator creates TLS certificates for workloads in your Kubernetes cluster and renews the certificates before they expire.
MongoDB CE operator: This Kubernetes operator deploys MongoDB Community into Kubernetes clusters.
Airlock: Airlock (open-source) is a Rocket.Chat Kubernetes operator that manages access and secrets for MongoDB clusters. It expects access requests (by launchcontrol) to create credentials for workspace databases and reconciles a connection string to be consumed by workspaces via a secret.
Launchcontrol: Launchcontrol (closed-source) is a Rocket.Chat Kubernetes operator that ultimately deploys and reconciles workspace deployments.
Prerequisites
You will need the following tools and resources:
An AWS account with appropriate permissions and credentials. The following credentials are required:
AWS access key ID
AWS secret access key
AWS session token
For example, the values can look something like this:aws_access_key_id=ASIAU5UIHF45NEXAMPLE aws_secret_access_key=zXnrIP9hDFTH6cd289k6NjGThjUYkiHJbvEXAMPLE aws_session_token=AYUGH7FC59O...<remainder of session token>
Install AWS CLI.
Go to the AWS CLI GitHub repository and follow the installation instructions for your OS.
After installing the AWS CLI, configure your AWS credentials according to your requirements. For example, you can use the
aws configurecommand, environment variables, or a config file. See the AWS CLI Getting Started section for details.
Get a custom domain for the workspace. Launchpad will handle the SSL certificates with Let’s Encrypt. You will also need to set a CNAME record for the URL. The CNAME will be created and displayed during the deployment process.
Install eksctl: Follow the installation instructions from the EKS CLI GitHub repository based on your OS.
Install kubectl: Follow the installation instructions from the Kubernetes documentation based on your OS.
Workspace file upload settings: We recommend using Amazon S3 storage services to store your workspace files. After the workspace is deployed, configure the workspace’s file storage settings—you will need the S3 bucket name, access key, and secret key.
This guide primarily uses AWS EKS to deploy Rocket.Chat with Launchpad. Alternatively, you can use K3s, a lightweight Kubernetes distribution. In this case, the requirements are as follows:
Install K3s instead of EKS and have the cluster ready. Note that the K3s cluster must be installed without traefik (--disable=traefik) as it is present in the Launchpad components.
Install the Longhorn dependencies. Launchpad uses this Kubernetes block storage system to manage storage volumes for K3s.
Database options
You have two options when configuring MongoDB with Rocket.Chat:
Use external MongoDB: Bring your own external MongoDB and connect it with Rocket.Chat. We recommend using MongoDB Atlas (M20 or M30 cluster tier).
If you use this option, you will need the connection string to connect the database cluster with Rocket.Chat. For example,
mongodb+srv://<user>:<pass>@cluster1.q9p55.mongodb.net/dbIn this case, we recommend that the cluster be in the same or near the AWS region. If you are using Atlas, we recommend peering.
Use the in-built MongoDB setup: Rocket.Chat’s Launchpad deployment also comes with an out-of-the-box MongoDB configuration. This option is ideal for users who do not want to manage an external database.
Choosing this option should behave no differently than MongoDB Atlas M20-M30. The current Launchpad MongoDB configuration stores 30GB by default, and as of now, the tool doesn’t provide a way to resize the disk.
When deploying with this option, Launchpad uses Airlock (open-source)—a Rocket.Chat Kubernetes operator that manages access and secrets for MongoDB clusters.
In this guide, we will cover both options.
Step 1: Get the binary
Download the latest binary zip file based on your OS (Linux/Windows/macOS):
Linux (amd64) - https://go.rocket.chat/i/launchpad-linux-amd64-latest
Linux (arm) - https://go.rocket.chat/i/launchpad-linux-arm-latest
Linux (arm64) - https://go.rocket.chat/i/launchpad-linux-arm64-latest
macOS (amd64) - https://go.rocket.chat/i/launchpad-darwin-amd64-latest
macOS (arm64) - https://go.rocket.chat/i/launchpad-darwin-arm64-latest
Windows (amd64) - https://go.rocket.chat/i/launchpad-windows-amd64-latest
Checksums (latest) - https://go.rocket.chat/i/launchpad_checksums-latest
Unzip the downloaded file. For example, you can use the following command for the Linux file:
tar -xzvf launchpad-linux-amd64.tar.gzYou will find the following files in the unzipped folder:
examples/deploy-with-mongo.yaml: This is the YAML configuration file used to deploy a workspace with built-in MongoDB.examples/deploy.yaml: This is the YAML configuration file to deploy a workspace with external MongoDB.launchpad: This is the launchpad application that will be used to deploy a workspace.
Now you can run the
./launchpad versioncommand. Depending on the version, you should get a response like this:
launchpad version 0.4.0, blueprints v1.2.0-alpha1, commit 4cf34edcaffd030ab00da08834eca9ea1abc3036 (2026-01-29T20:19:20Z), go version go1.24.4Run the
./launchpadcommand to view the usage and available commands. The following screenshot shows an example:
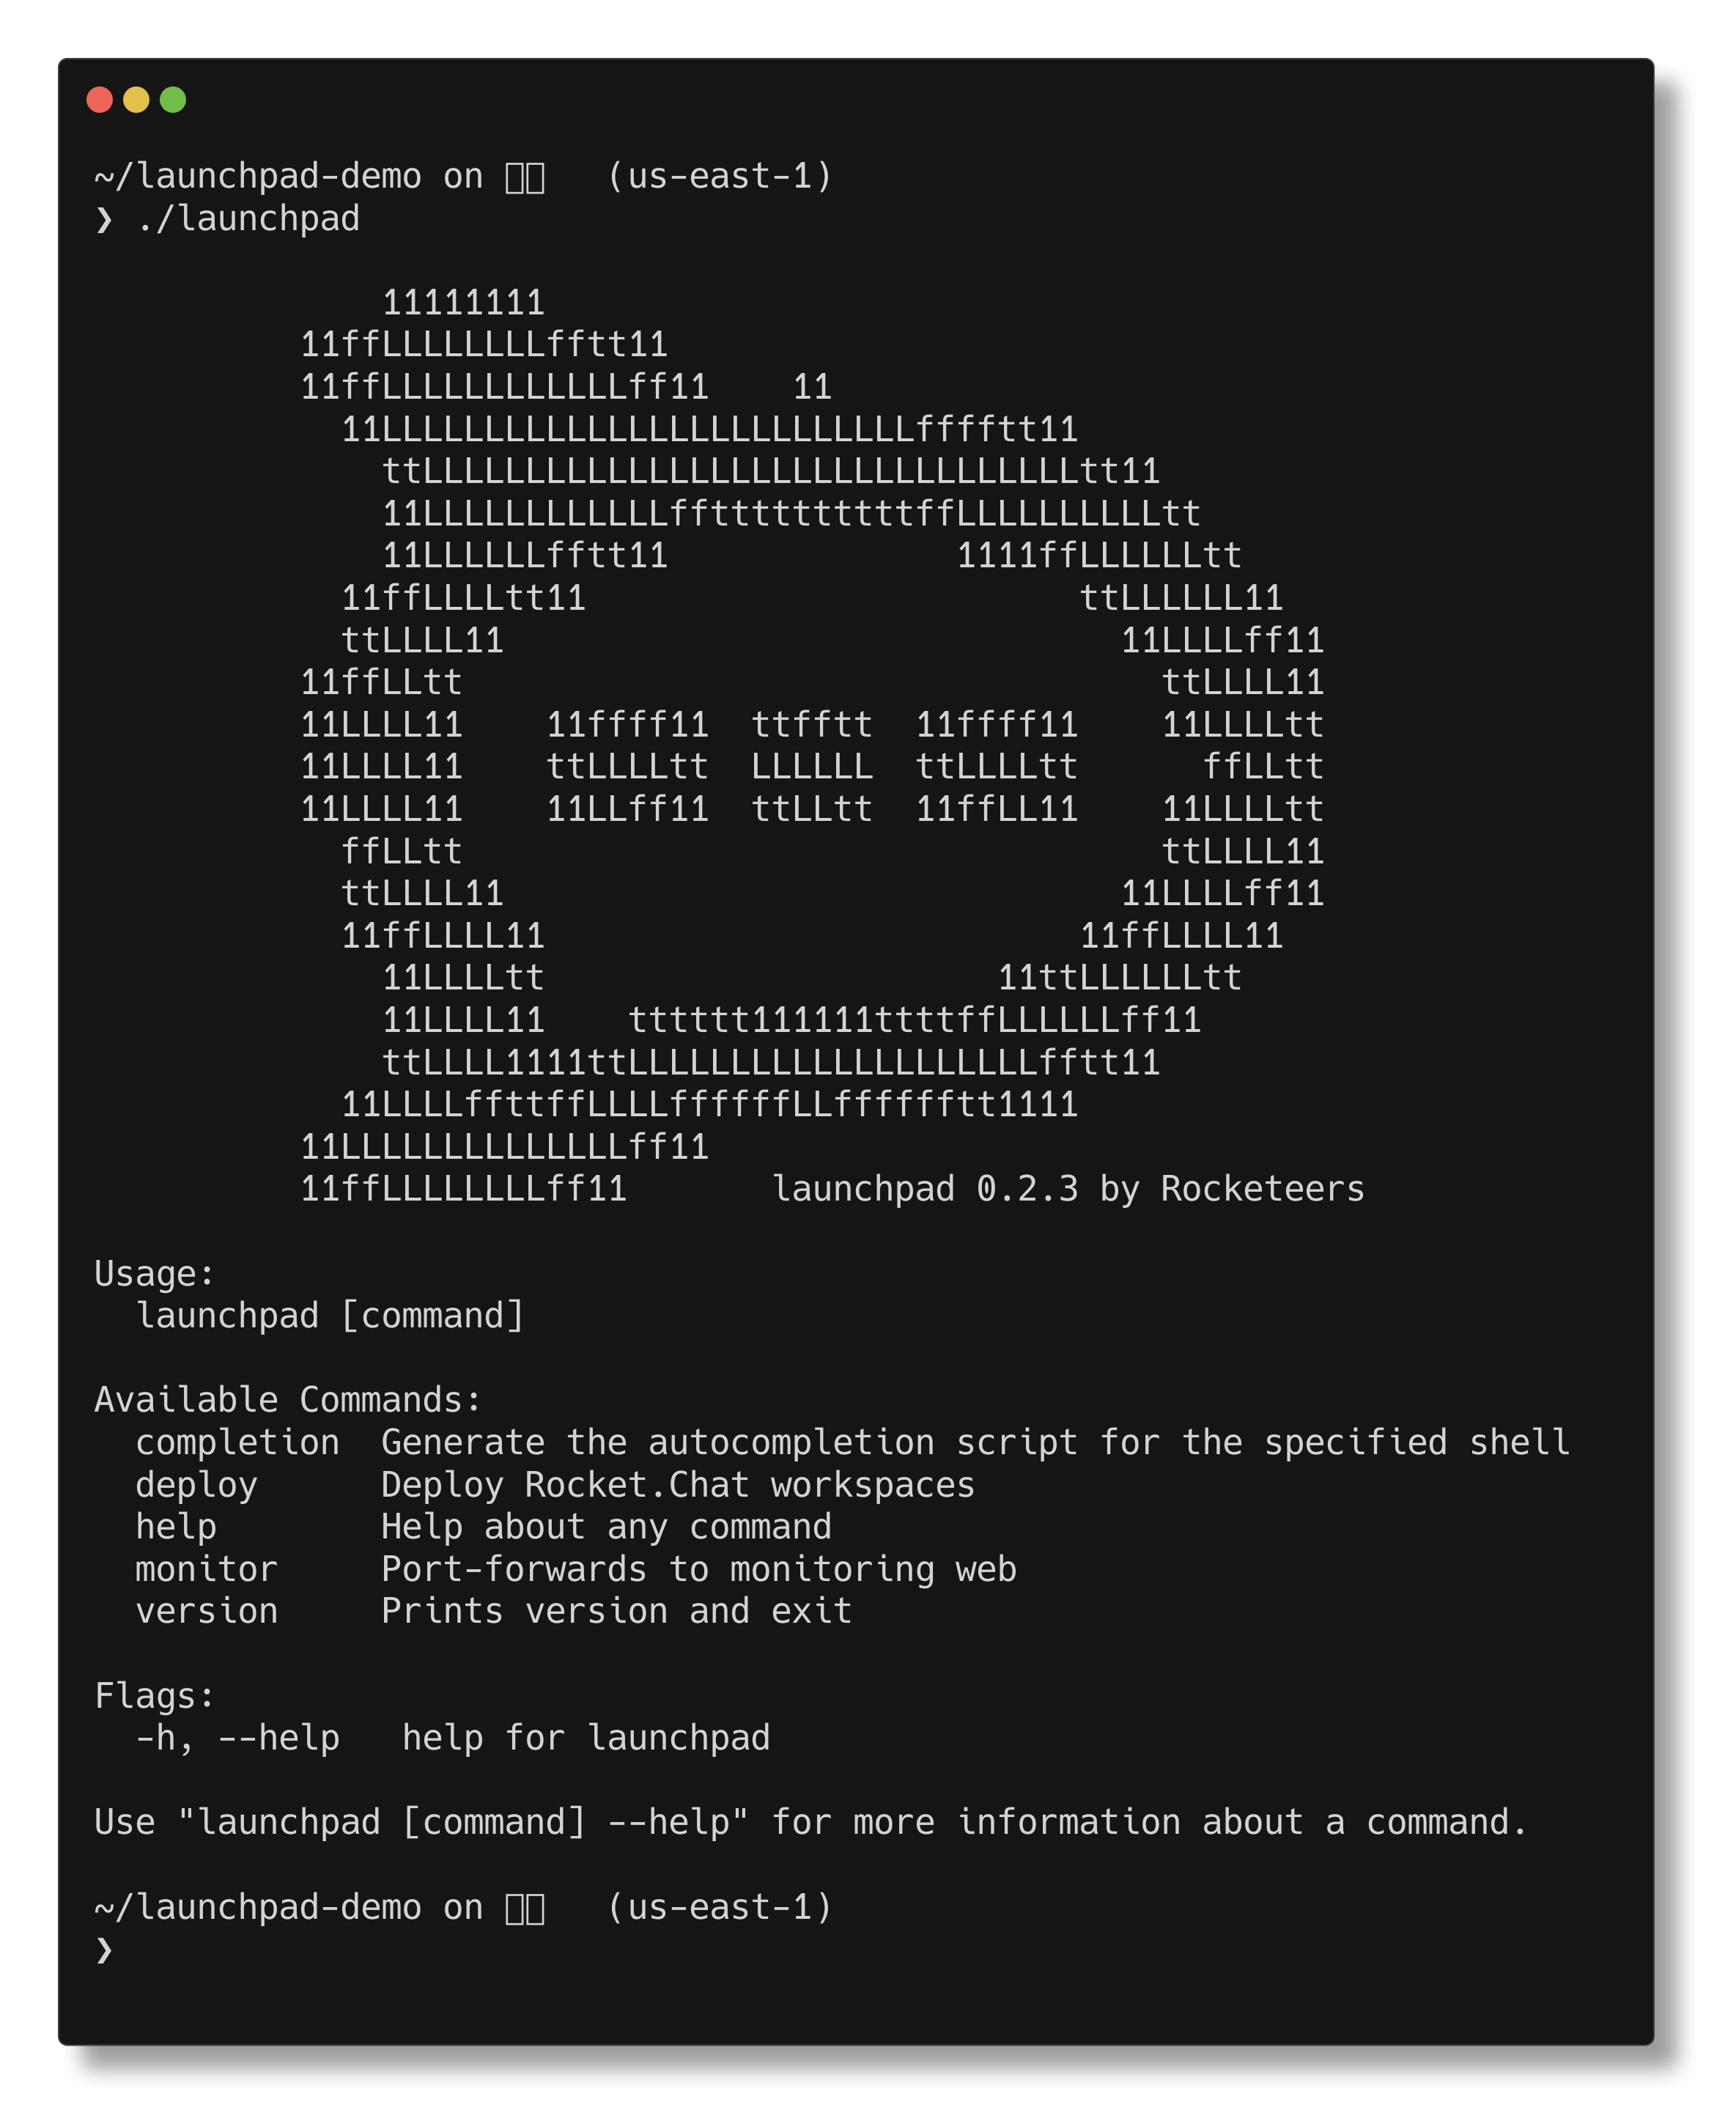
If you get an error, make sure that you run the command in the folder where the launchpad application file is present.
Step 2: Create the cluster
Before you begin this step, make sure that you have installed the required tools. Also, authenticate your AWS credentials to access the resources using the aws configure command, if you haven’t already done so. You are prompted to enter AWS access keys, which you can find in your AWS account.
In this step, we will create a YAML file to create an EKS cluster. Some parameters will be different depending on whether you use the built-in MongoDB configuration or external MongoDB.
Follow these steps based on your choice of configuration:
In the directory where the Launchpad application is present, create the
eks-basic.yamlfile by running the following command:
nano eks-basic.yamlEnter the following values in the file:
# eks-basic.yaml
# More examples at https://github.com/eksctl-io/eksctl/tree/main/examples
apiVersion: eksctl.io/v1alpha5
kind: ClusterConfig
metadata:
  name: dev-eks-launchpad # This is the cluster name. You can change the name if you need to.
  region: us-east-1 # Change the client region if it is other than us-east-1.
  version: "1.33" # Kubernetes version. Change the value if required.
addons:
  - name: aws-ebs-csi-driver # required for monitoring, MongoDB
    version: 1.47.0
vpc:
  cidr: 10.0.0.0/16
nodeGroups:
  - name: dev-eks-node-group
    instanceType: t3.large  # At least t3.large is required.
    desiredCapacity: 3       # At least 3 is required.
    privateNetworking: true
    iam:
      withAddonPolicies:
        ebs: true            # required for monitoring, MongoDB
Save and close the file.
In the directory where the Launchpad application is present, create the
eks-basic.yamlfile by running the following command:
nano eks-basic.yamlEnter the following values in the file:
# eks-basic.yaml
# More examples at https://github.com/eksctl-io/eksctl/tree/main/examples
apiVersion: eksctl.io/v1alpha5
kind: ClusterConfig
metadata:
  name: dev-eks-launchpad # This is the cluster name. You can change the name if needed.
  region: us-east-1 # Change the client region if it is other than us-east-1.
  version: "1.33" # Kubernetes version. Change the value if required.
addons:
  - name: aws-ebs-csi-driver # required for monitoring, MongoDB
    version: 1.47.0
vpc:
  cidr: 10.0.0.0/16
nodeGroups:
  - name: dev-eks-node-group
    instanceType: t3.large  # To deploy with built-in MongoDB, at least t3.large is required.
    desiredCapacity: 5      # To deploy built-in MongoDB, at least 5 is required.
    privateNetworking: true
    iam:
      withAddonPolicies:
        ebs: true            # required for monitoring, MongoDB
Save and close the file.
Run the following command to create the cluster:
eksctl create cluster -f eks-basic.yaml --kubeconfig=basic.configThe cluster creation process begins. It may take some time to create the stacks (about 15-20 minutes). This command also creates a basic.config Kubernetes configuration file, which contains the cluster details.
According to your organization’s requirements or your AWS account setup, you may need to specify your AWS profile to create the cluster. In this case, use the following command to create the cluster:
eksctl --profile <aws-account-profile-name> create cluster -f eks-basic.yaml --kubeconfig=basic.config
Once the cluster creation process is complete, run the following command to view the nodes:
kubectl get nodesIf you are using the built-in MongoDB option, you should get five nodes, and if you are using an external DB, you should get three nodes. The following screenshot shows an example with five nodes:
.png)
If you get an error with the message “Unhandled error”, refer to the Troubleshooting section for resolution steps.
Step 3: Update the deployment file
In this step, we will update the environment variables in the deployment YAML file to set the workspace address, name, and other parameters. The examples folder contains two YAML files: deploy.yaml and deploy-with-mongo.yaml. If you are using an external MongoDB setup, you must modify the deploy.yaml file. Otherwise, modify the deploy-with-mongo.yaml file to use the built-in MongoDB configuration.
Follow the steps according to the file you choose:
Go to the
examplesfolder and open thedeploy.yamlfile.Update the values of the following parameters:
assets: blueprints/v1alpha1
name: launchdemo # This is your workspace's name. Change the value according to your needs.
version: 7.10.0 # Set the Rocket.Chat version you want to deploy.
address: https://launchpad-demo.rocket.chat # Enter your workspace URL.
size: small # Default configuration, cannot be changed.
environment:
  REG_TOKEN: my-registration-token # You can change this value if you have received a registration token from our support or sales team. Otherwise, leave it as is.
  MONGO_URL: "mongodb+srv://<user>:<password>@cluster/db" # The MongoDB Atlas connection string.
acme:
  letsencrypt:
    enabled: true
    email: "example@email.com" # Enter your email ID to generate SSL certificate.
After updating and saving the file, exit the
examplesfolder and return to the directory where the Launchpad application is present.
Go to the
examplesfolder and open thedeploy-with-mongo.yamlfile.Update the values of the following parameters:
assets: blueprints/v1alpha1
name: launchdemo # This is your workspace's name. Change the value according to your needs.
version: 7.10.0 # Set the Rocket.Chat version you want to deploy.
address: https://launchpad-mongo.writing-demo.dev.rocket.chat # Enter your workspace URL.
size: small # Default configuration, cannot be changed.
environment:
  REG_TOKEN: my-registration-token # You can change this value if you have received a registration token from our support or sales team. Otherwise, leave it as is.
acme:
  letsencrypt:
    enabled: true
    email: "example@email.com" # Enter your email ID to generate SSL certificate.
mongodb:
  enabled: true
  allowGridFSUploads: false # using S3 instead is highly recommended.
  createAdminPassword: banana # optional, defaults to "admin". Can be removed after first install.
After updating and saving the file, exit the
examplesfolder and return to the directory where the Launchpad application is present.
Step 4: Deploy Launchpad
Now we are ready to deploy the workspace with Launchpad, depending on whether you are using the built-in MongoDB configuration or external MongoDB setup:
Make sure you are in the directory where the Launchpad application is present. Run the following deployment command:
./launchpad deploy -f examples/deploy-with-mongo.yaml -k basic.config -p eksIf you are using K3s, deploy with the
-p k3sflag as follows:./launchpad deploy -f examples/deploy-with-mongo.yaml -k basic.config -p k3s
Make sure you are in the directory where the Launchpad application is present. Run the following deployment command:
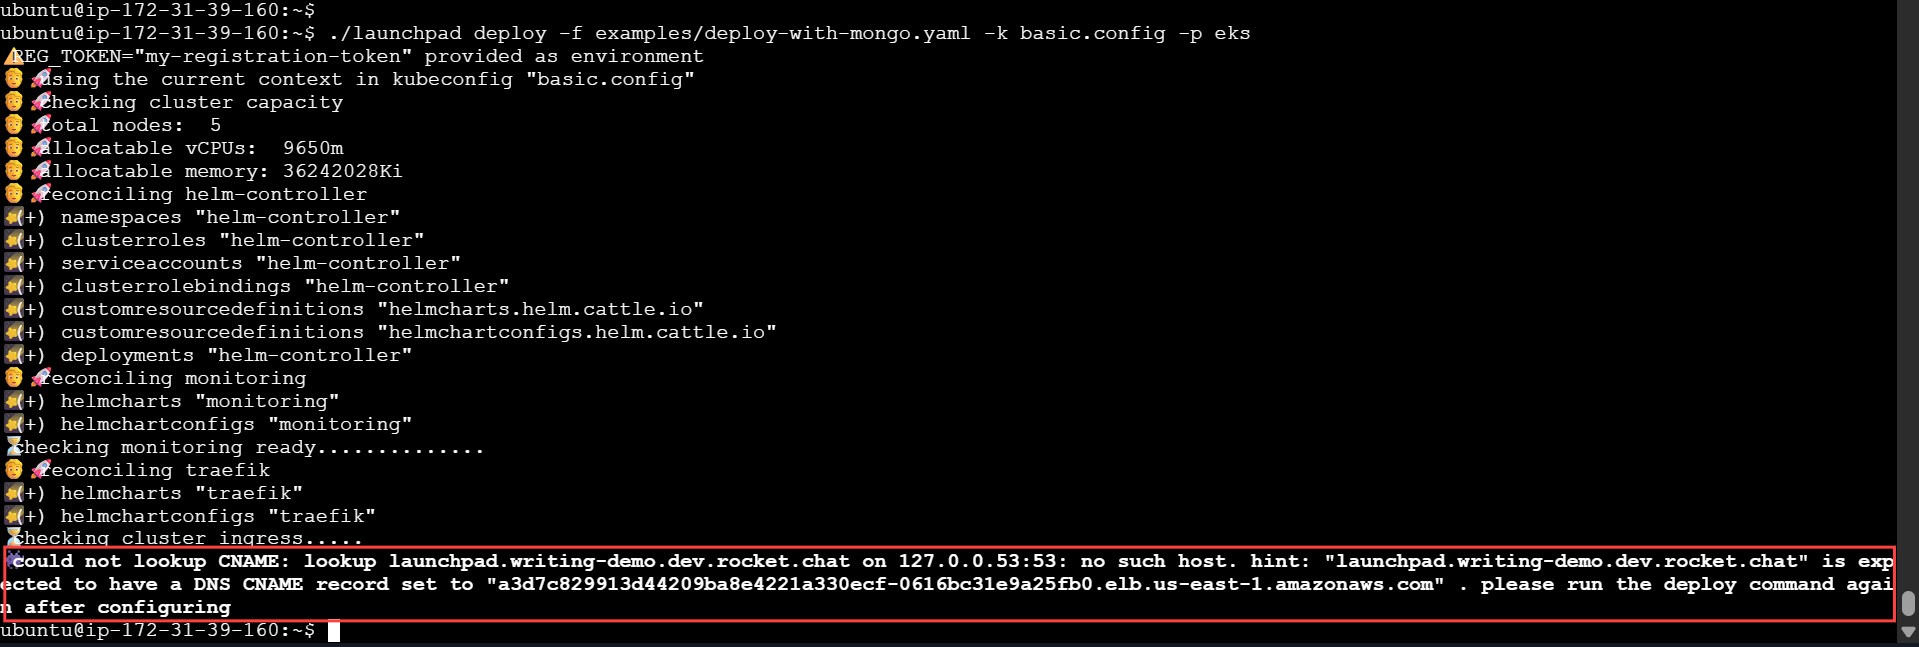
./launchpad deploy -f examples/deploy.yaml -k basic.config -p eksDeploying Rocket.Chat with Launchpad for the first time requires an additional step. Once you run the deployment command above, configuration checks are performed, and if everything is okay, the CNAME is displayed. You must set the CNAME value to your workspace address. This is a way to make sure the intended address is pointing to the cluster correctly before we proceed.
The following screenshot shows an example of the CNAME being displayed:
After setting the CNAME to the workspace URL, run the deploy command again. The following screenshot shows what you can expect once the deployment is successful:
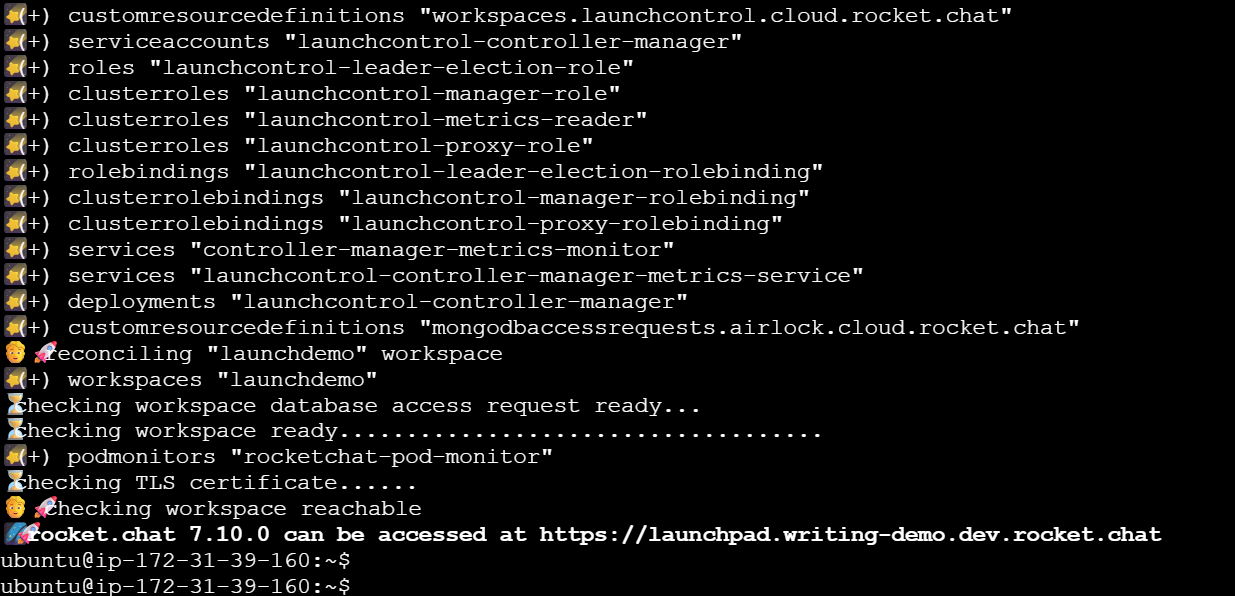
The workspace should be available at the URL address in a few minutes.
Step 5: Access your workspace
Great! You’ve successfully created your Rocket.Chat workspace with Launchpad. Access it using the workspace URL that you have defined in the configuration.
After the workspace loads, follow the on-screen prompts to create your first admin user and complete the initial workspace setup. Your workspace and email will be registered with the Rocket.Chat Cloud portal during this process.
Next, explore the following resources to continue using your new workspace:
User Guides: Learn the basics of your Rocket.Chat account, the types of rooms, and how to communicate with your workspace users.
Workspace Administration: Administrators and owners can set and manage various configurations. To share files on the workspace, make sure to configure the workspace file upload settings.
Marketplace: Explore the available apps to enhance your workspace.
Monitor your workspace
Using Launchpad, you can monitor your workspace with the basic.config file by running the following command:
./launchpad monitor -k basic.configThen go to this URL in your browser: http://localhost:8080/d/rocketchat-metrics/rocket-chat-metrics. You are redirected to Grafana. Enter admin as the username and password to access the dashboard. You are prompted to change the password. Upon logging in, you can view the Rocket.Chat Metrics dashboard.
The following screenshot shows an example:
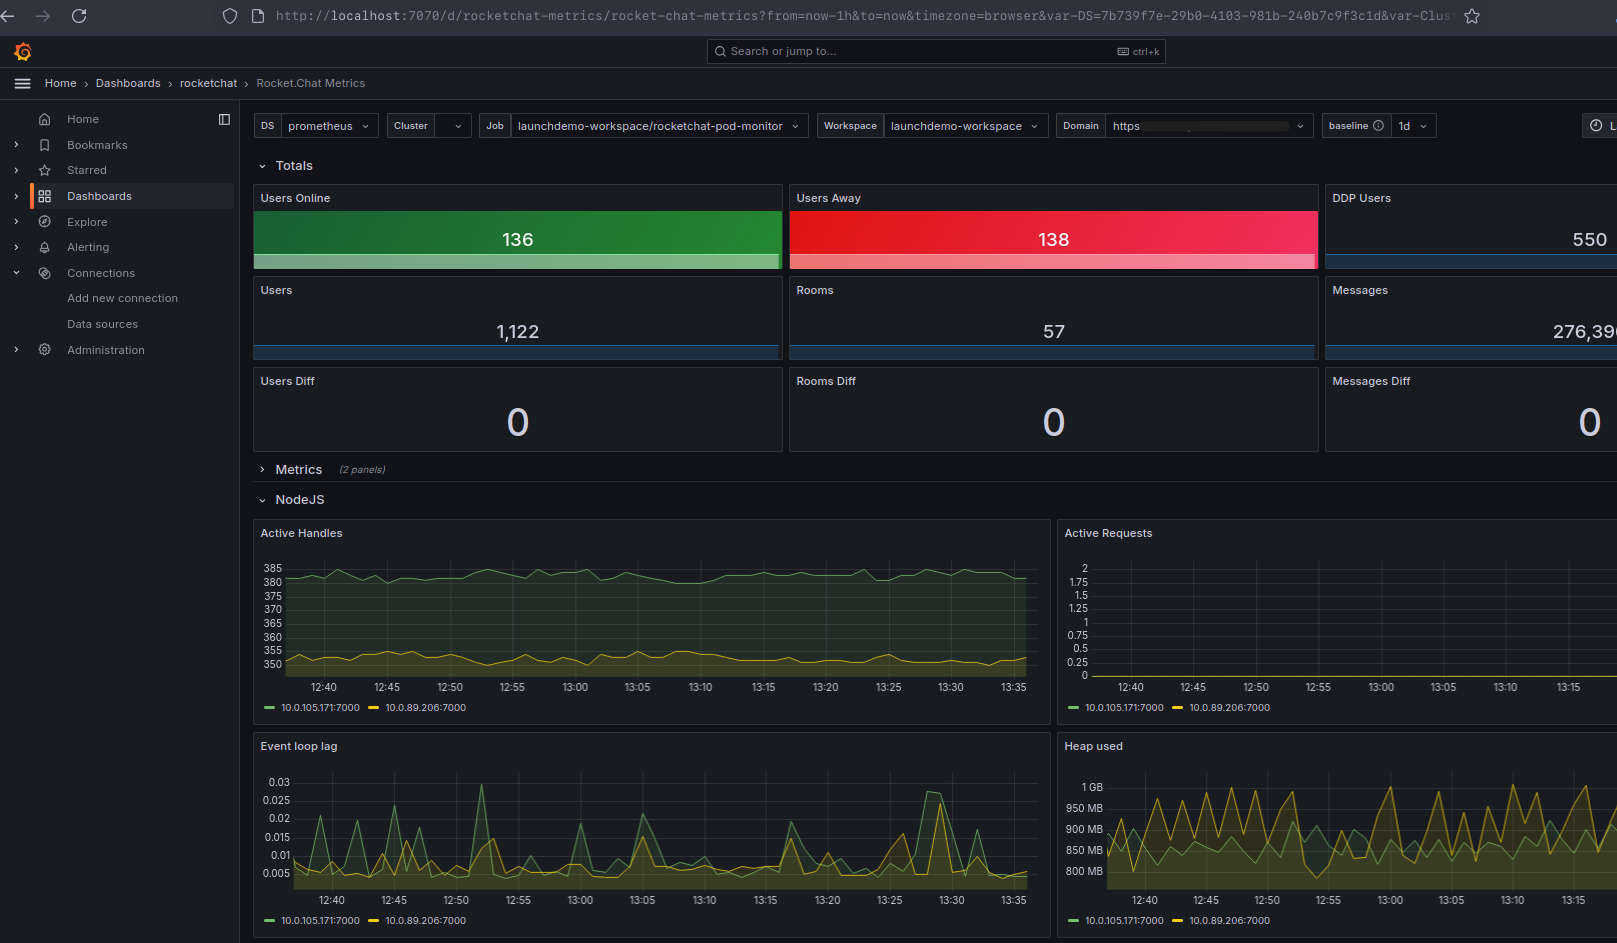
Click Dashboards from the top menu to view the available dashboards:
.png)
Select the Rocket.Chat Logs option to view the workspace logs. Enter Ctrl + C in the CLI to stop the port forwarding and stop accessing the dashboard.
Update workspace version
To update the workspace version, modify the deploy-with-mongo.yaml or deploy.yaml file and change the version. Then run the Launchpad deploy command.
Make sure you are in the directory where the Launchpad application is present. Run the following deployment command:
./launchpad deploy -f examples/deploy-with-mongo.yaml -k basic.config -p eksMake sure you are in the directory where the Launchpad application is present. Run the following deployment command:
./launchpad deploy -f examples/deploy.yaml -k basic.config -p eksAccess Rocket.Chat Cloud
With Launchpad version 0.3.0, you can log in to the Rocket.Chat Cloud portal and take actions directly from the command line. The following commands are available:
./launchpad cloud login: Run this command to log into the Rocket.Chat Cloud portal (cloud.rocket.chat) from the CLI. You are prompted to authorize the login on a browser. This allows the Launchpad tool to perform actions on behalf of your Rocket.Chat Cloud account, which allows you to view and connect to new workspaces../launchpad cloud generate: Running this command displays the list of existing workspaces and gives you the option to create a new one. Whether you select an existing workspace or a new one, the tool generates a YAML file containing the deployment configuration ready to be used by thelaunchpad deploy -f <configuration>command.You can select an existing workspace if you want to redeploy the workspace with Launchpad or migrate to a self-managed workspace. In this case, you must first contact your Rocket.Chat CSM to prepare for the transition. Then, the
launchpad cloud generatecommand will display the new workspace.Alternatively, you can select the option to create a new workspace (Starter plan). Once you generate the workspace on the CLI, it is available on the Cloud portal.
Use the
--helpflag to view the overview of the command usage.
./launchpad cloud logout: Run this command to log out of the Cloud portal.
If you're in a more constrained environment, the optional
--air-gappedflag adds additional configuration for the server to acknowledge your license before your workspace's first contact with Rocket.Chat Cloud.
Troubleshooting
I’m getting the error “Could not look up <workspace-url>“ when I run the deploy command again after setting up the CNAME record.
If you still see the hint when running the deploy command again after setting up the CNAME, make sure that the correct URL is specified in the deployment file and you’ve set up the correct CNAME value. Wait for a few more minutes and try running the command again, since it may take some time for the address to propagate.
The launchpad command doesn’t work.
Verify that you have unzipped the tar file you downloaded and that you are in the folder where the launchpad binary file is present.
After running the deploy command, I get the error that the workspace is not ready.
You may be seeing a hint like this:
.png)
The workspace may take a while to be ready. Try accessing the workspace URL. If you’re unable to access it, wait for a few minutes and try again.
I cannot send file attachments on the workspace.
By default, the file storage settings are set to use Amazon S3. We recommend using Amazon S3 storage services to store your workspace files. Refer to the File Upload Settings guide to configure the workspace’s file storage settings.
I get an “Unhandled error“ when running the kubectl get nodes command.
kubectl get nodes command.The kubectl tool may not be using the cluster configuration that was created.
In Linux or macOS, run the following command:
export KUBECONFIG=basic.configOn Windows OS, run the following command:
$env:KUBECONFIG="basic.config"Ensure that you are pointing KUBECONFIG to the location where the basic.config file is present. Then run kubectl get nodes command again. The nodes should now be displayed.
You can run the kubectl config -h help command to view more information.
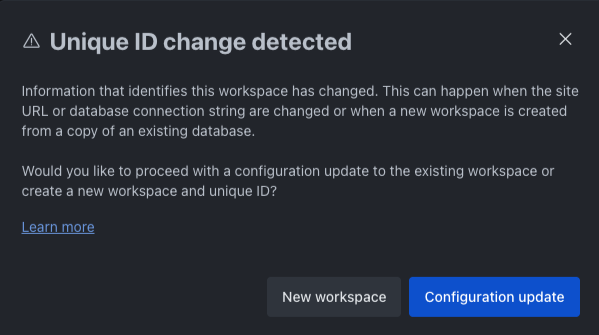
Why am I seeing a message about a “Unique ID change detected”?
This message appears when Rocket.Chat detects changes that may indicate a new deployment or a significant workspace configuration update. To prevent issues caused by cloned or duplicated deployments, Rocket.Chat uses a system called a fingerprint to verify the identity of each workspace.
What is the Unique ID?
The Unique ID is a hash that uniquely identifies a Rocket.Chat server. It is generated automatically the first time the server starts. This ID helps ensure that cloud features (e.g., license validation, push notifications) are only associated with a single workspace.
What should you do?
If you are deploying a new workspace, confirm it as a New workspace. In this case, Rocket.Chat will:
Generate a new Unique ID
Reset all cloud connections
Clear the cloud workspace link
Reset the cloud license
If this is not a new workspace and you have made configuration changes (e.g., you updated the site URL or changed database settings), click Configuration update.