Rocket.Chat’s Import feature allows you to import Omnichannel contacts using .csv files via three options:
Upload a
.csvfile from your local machine. To use this option, make sure that your workspace’s File Upload Settings are configured.Enter the public URL where the file is available.
Provide the server file path where the file resides in your Rocket.Chat server deployment.
To use this feature, your workspace must be on the Enterprise plan and have the Trusted Contact Management feature enabled.
CSV file structure
The .csv file must contain three primary fields:
nameemailsphones
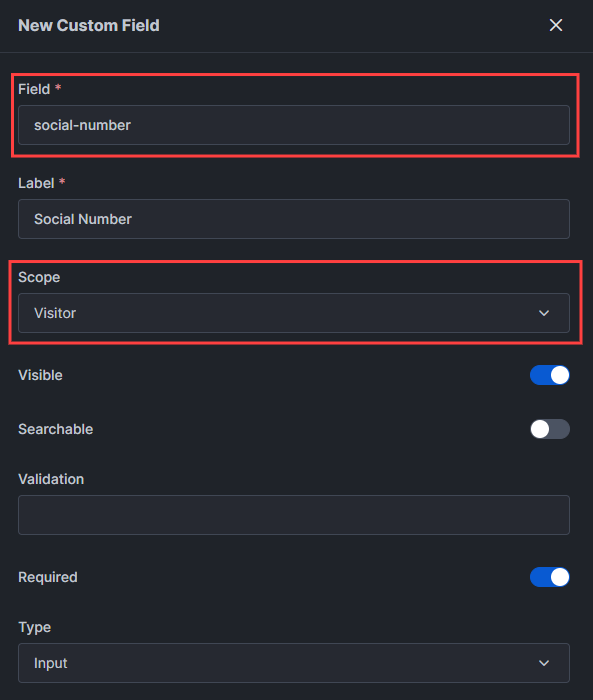
The system tries to find a custom field in Rocket.Chat for each additional column in the .csv file other than the primary ones listed above. So if you have additional fields, set them up as Custom Fields in Rocket.Chat to import them successfully. For example, if you have social-number as an additional field, create the corresponding custom field Rocket.Chat first. Make sure that the Scope of the custom field is Visitor. The Field value must be the same as the column name of the additional field, in this case, social-number.
The following screenshot shows an example of the custom field:

The following snippet shows a sample .csv file:
name,emails,phones,social-number
Jamie Larsen,sellersshannon@espinoza-young.info,7127434955,591-80-9596
Misty Hendricks,jhickman@hotmail.com,890-205-3908,727-76-6572
Jennifer Rodriguez DDS,kevin61@johnson-rodriguez.com,916.501.0002,454-08-9024
Melissa Gonzalez,josephalexander@robinson.com,(343)461-6364,671-11-4733
Kathleen Huff,jwiggins@sims.com,671.625.7847x29029,767-20-5160
Adam Jones,richardkeller@hotmail.com,001-528-446-3743,287-81-9282
Now your file is ready to be imported.
Import CSV file
In your Rocket.Chat workspace, go to Manage
 > Workspace > Import.
On the Import page, click Import New File.
From the Import Type drop-down menu, select the Omnichannel Contacts (*.csv) option.
Select the File Type from the drop-down menu.
If you select Upload, you can upload the file from your machine. Check your workspace’s File Upload Settings to ensure you can upload the file successfully.
If you use the Public URL option, enter the File URL where the file is available.
If you use the Server File Path option, enter the File Path where the file resides in your Rocket.Chat server deployment.
Click Import.
Once the file is parsed and loaded, you will find the list of contacts from the Contacts tab as shown in the following screenshot:
.png)
You can verify the contacts here and remove any you don’t want to import by deselecting the checkbox.
Click Start Importing.
Your Omnichannel contacts are now available in your workspace! If you encounter problems during the import process, you can view the logs by clicking Reports in the admin section.