This guide walks you through setting up a local LDAP server to test Rocket.Chat’s LDAP integration. We’ll use Osixia OpenLDAP a lightweight Docker-based OpenLDAP implementation, to create a practical environment for experimentation and configuration validation.
Prerequisites
Before you begin, ensure the following are installed on your machine:
Docker: Used to deploy the OpenLDAP server locally.
An LDAP management tool: This guide uses Apache Directory Studio (ADS), but alternatives like phpLDAPadmin are also suitable.
A local Rocket.Chat workspace: Required for testing LDAP authentication and synchronization.
Step 1: Run an LDAP server
Rocket.Chat supports connecting to both OpenLDAP and Active Directory servers for authentication and directory synchronization.
In this section, we’ll deploy an OpenLDAP server using Docker. To create the Docker compose file:
Navigate to your preferred working directory.
Create a file named
docker-compose.yml.Add the following configuration:
services:
  openldap:
    image: osixia/openldap:1.3.0
    container_name: rc-openldap
    environment:
      LDAP_LOG_LEVEL: "256"
      LDAP_ORGANISATION: "rcldap"
      LDAP_DOMAIN: "rcldap.com.br"
      LDAP_ADMIN_PASSWORD: "admin"
    volumes:
      - /var/lib/ldap
      - /etc/ldap/slapd.d
      - /container/service/slapd/assets/certs/
    ports:
      - "389:389"
      - "636:636"
Step 2: Connect to the LDAP Server
Once the container is running, you can connect to the LDAP server using your preferred LDAP management tool (such as Apache Directory Studio).
Start the container
If you haven’t already started the service, run:
docker compose up -dThis deploys the OpenLDAP server locally:
LDAP:
ldap://localhost:389LDAPS:
ldaps://localhost:636(requires SSL configuration)
Create a new LDAP connection
Open your LDAP management tool and create a new connection.
In Apache Directory Studio, navigate to the Connections view and select New Connection.
Use the following configuration:
Host name:
localhostPort:
389Encryption method: No encryption (for this example)
Authentication method: Simple Authentication
Bind DN (Admin user):
cn=admin,dc=rcldap,dc=com,dc=brBind password:
admin
The Bind DN is automatically generated based on the
LDAP_DOMAINandLDAP_ADMIN_PASSWORDvalues defined in thedocker-compose.ymlfile.
Authentication configuration (Apache Directory Studio)
Your authentication screen should resemble the following:
Authentication Method: Simple Authentication
Bind DN or user:
cn=admin,dc=rcldap,dc=com,dc=brPassword:
admin
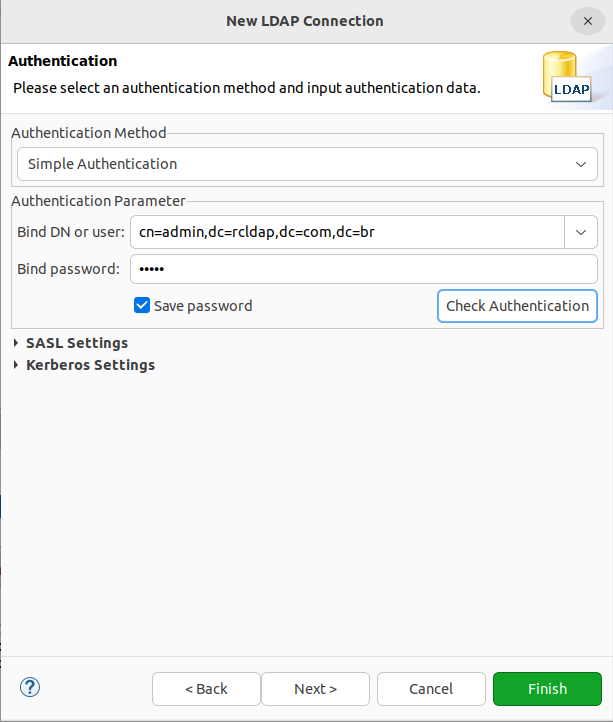
After entering the credentials:
Click Check Authentication to verify the connection.
Click Finish to complete the setup.
If the configuration is correct, the LDAP server will appear in the Connections panel, and you will be able to browse the directory structure.
Verify the LDAP directory structure
After successfully connecting to the LDAP server through Apache Directory Studio (ADS), the LDAP tree structure should be displayed.
At this stage, the directory contains:
The standard domain:
dc=rcldap,dc=com,dc=brThe administrator account:
cn=admin
Your LDAP browser should show the domain entry with the admin user nested under it, as illustrated below.
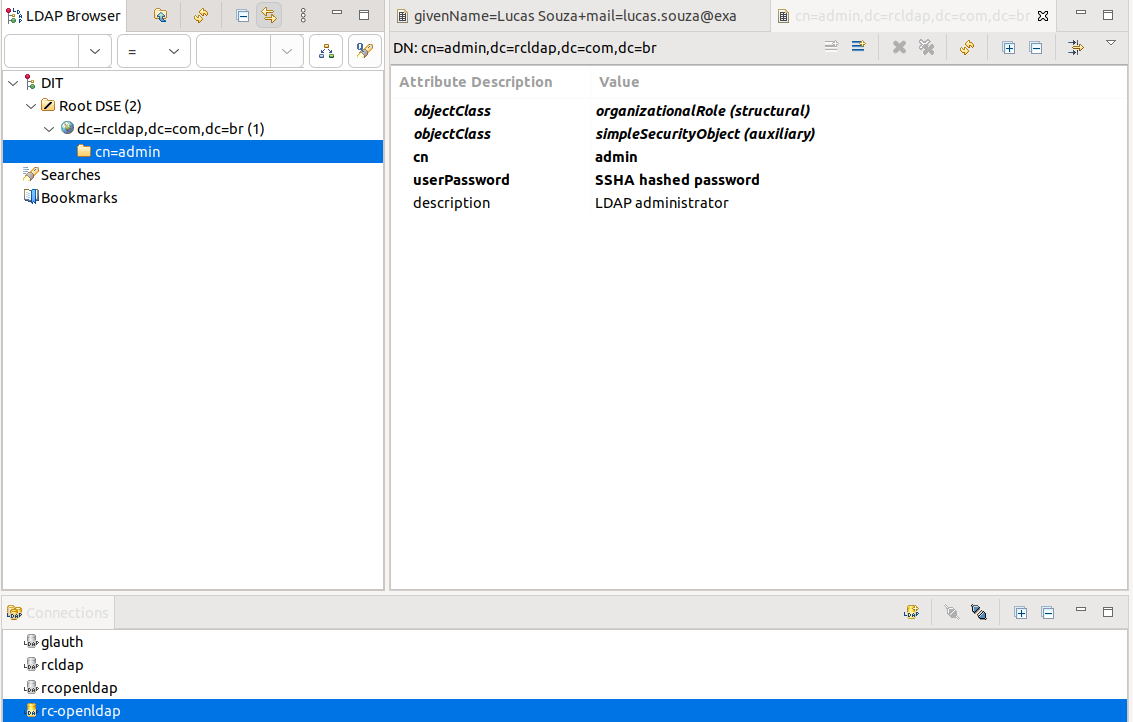
ADS is now ready to populate the LDAP server with groups and users that can connect to Rocket.Chat.
Add organizational units, users, and groups
For this example use case, all users and organizational units will be added under the default domain created during the LDAP server setup.
You can refer to the Oracle LDAP Security Fundamentals documentation for additional information about Users, Groups, and Organizational Units in LDAP servers.
After creating all organizational units, groups, and users as described in the following steps, your LDAP tree structure should look like this:
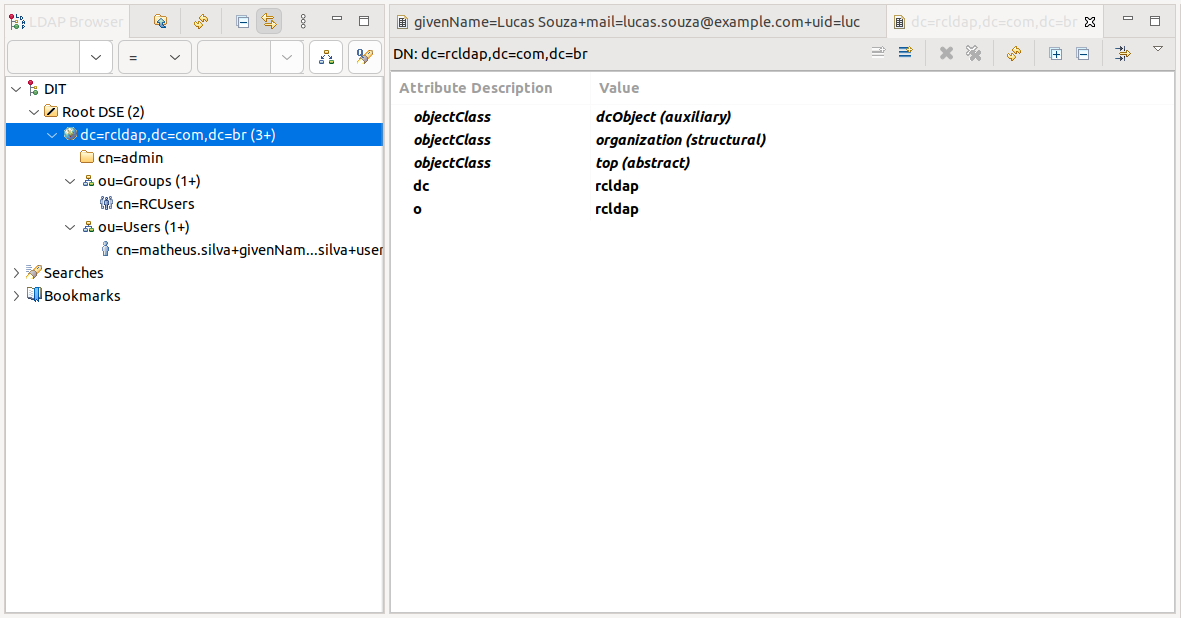
Organizational units
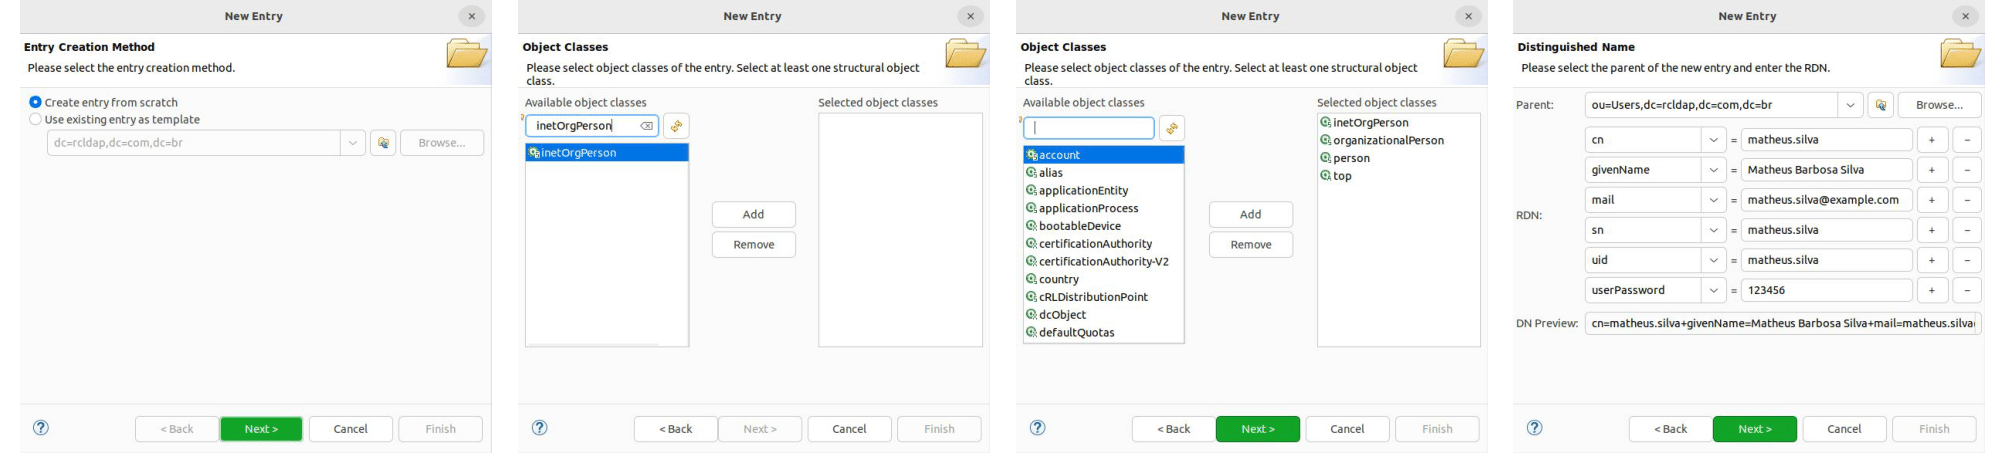
To add new organizational units within the default domain, right-click the domain element (dc=rcldap,dc=com,dc=br) in the tree structure, then select New > New Entry and follow the steps below.
Create two organizational units using the organizationalUnit object class:
Users
Groups
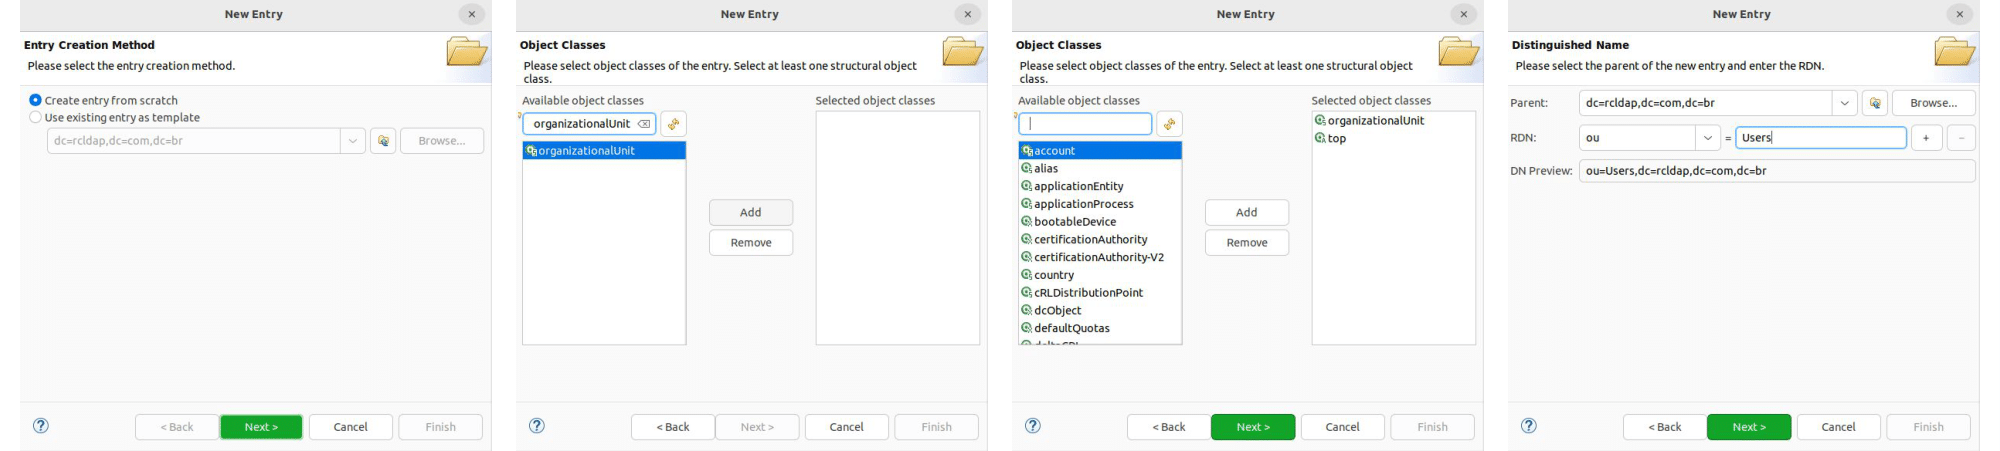
Users
For this example, users must be created under the Users organizational unit.
Right-click the ou=Users element in the tree structure, then select New > New Entry and follow the steps shown below.
Use the inetOrgPerson object class.
Groups
For this example, only users who are members of a specific LDAP group will be allowed to log in to Rocket.Chat.
To configure this, create a new RCUsers group under the Groups organizational unit. Right-click the ou=Groups element in the tree structure, then select New > New Entry and follow the steps shown below.
Use the groupOfNames object class. In the final step, browse to the user you previously created and assign it to the group by adding it to the member attribute.
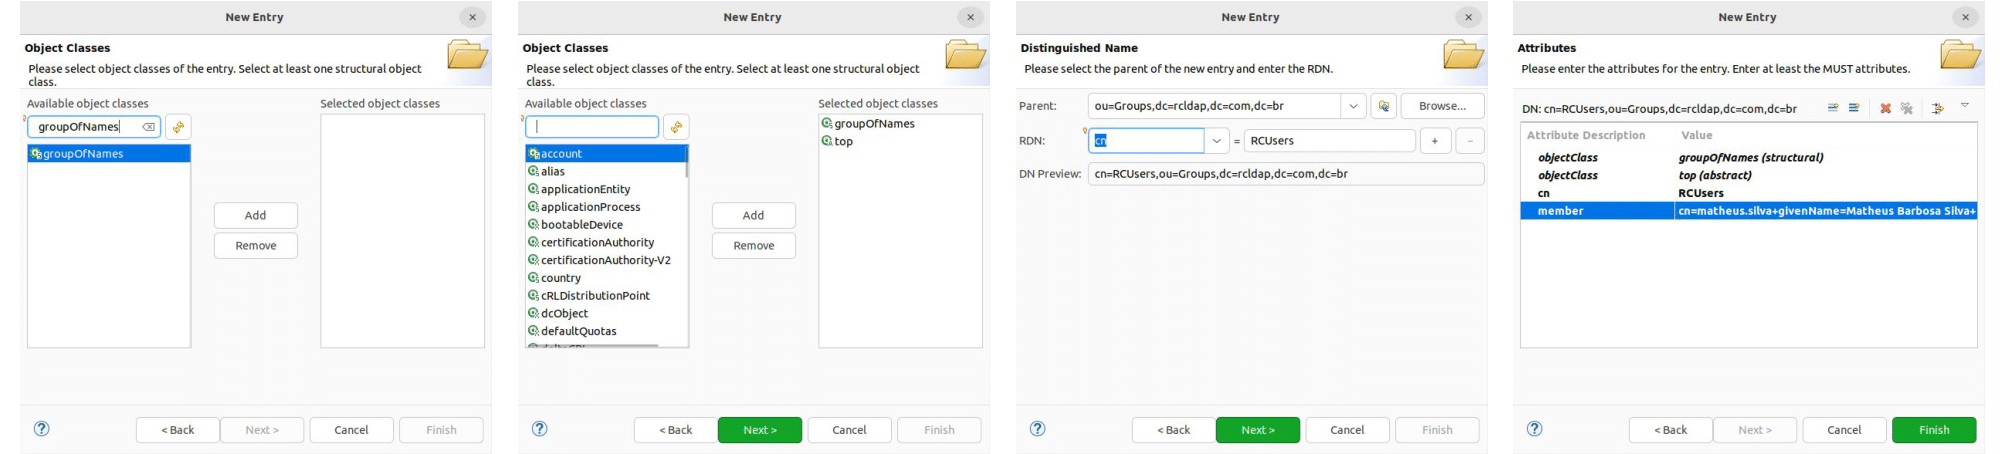
Additional members can be added later by creating new member attributes in the existing RCUsers group.
Configure LDAP in Rocket.Chat
After setting up and populating your LDAP server, the next step is to configure Rocket.Chat to connect to it.
In this section, you will:
Configure the LDAP connection
Set up authentication credentials
Define user and group search filters
(Optional) Configure SSL for secure connections
Connection
Go to Manage ![]() > Settings > LDAP > Connection, enable LDAP, and configure the following settings:
> Settings > LDAP > Connection, enable LDAP, and configure the following settings:
Server Type:
OtherHost:
localhostPort:
389
Save the changes and click Test Connection in the upper-right corner of the screen. A “LDAP Connection Successful” toast message should appear.
Authentication
Navigate to LDAP > Connection > Authentication and configure:
User DN:
cn=admin,dc=rcldap,dc=com,dc=brPassword:
admin
Search filter
Go to LDAP > User Search > Search Filter and configure the following:
Base DN:
dc=rcldap,dc=com,dc=brFilter:
(objectclass=inetOrgPerson)Scope:
subSearch Field:
uidSearch Page Size:
250Search Size Limit:
1000
After completing this step, you should be able to search LDAP users in your workspace using the configured connection. Click Test LDAP Search in the upper-right corner of the screen, enter a user's uid, and confirm that a success toast message is displayed.
Group filter
Configuring this section restricts access to Rocket.Chat to members of the RCUsers group created in the previous steps.
Go to LDAP > User Search > Group Filter, enable Enable LDAP User Group Filter, and configure:
Group ObjectClass:
groupOfNamesGroup ID Attribute:
cnGroup Member Attribute:
memberGroup Member Format:
#{userdn}Group name:
RCUsers
After this configuration, LDAP users should be able to log in to Rocket.Chat using their uid or mail and the password set in the LDAP server.
To sync users that exist in your LDAP directory but not in Rocket.Chat, enable Background Sync Import New Users under LDAP > Premium > Background Sync, then click Sync Now to import them into your workspace.
Log in with an email address
Rocket.Chat allows workspace owners to choose which LDAP fields are used to identify users during authentication.
By default, the uid field is used, allowing users to log in with their username and password. This can be customized under LDAP > User Search > Search Filter > Search Field to support different login formats:
Log in with either email address or username:
uid,mailLog in with email address only:
mail
LDAP SSL connection
When LDAP is enabled, the login form authenticates users via LDAP instead of the internal account system.
In this example, Stunnel is used to create a secure connection to the LDAP server.
Create a new configuration file at /etc/stunnel/ldaps.conf with the following content:
options = NO_SSLv2

[ldaps]
client = yes
accept = 389
connect = your_ldap_server.com:636
To enable Stunnel automatic startup, change the ENABLED variable in /etc/default/stunnel4 to 1:
# Change to one to enable stunnel automatic startup
ENABLED=1
Finally, on the Rocket.Chat server under /admin/LDAP, configure:
LDAP host:
localhostLDAP port:
389
By adjusting these settings according to your environment, you can ensure a secure and efficient configuration.
This concludes the LDAP configuration section, covering connection and user management settings in Rocket.Chat.