Microsoft's Active Directory Federation Services (ADFS) provides users with single sign-on access to systems and applications. It's used to securely share digital identity and permissions across applications. This simplifies user experience while implementing robust security policies.
ADFS provides an identity provider service that can be consumed by Rocket.Chat for authentication. This example walks you through the steps to configure your ADFS environment with your Rocket.Chat workspace.
If you are using Active Directory without Federation Services, you should perform the user synchronization via LDAP only.
Prerequisites
A Windows Server with the ADFS environment. See Deploy and Configure AD FS to learn about this.
A Rocket.Chat workspace and permission to modify the SAML settings.
Configure SAML in Rocket.Chat
For this example, the Rocket.Chat configuration is done as follows:
Navigate to Manage
 > Workspace > Settings > SAML.
Enable SAML and provide a name for the Custom Provider field. For example,
test-adfs.Enter the endpoints for the Custom Entry Point and IDP SLO Redirect URL fields. For example,
Custom Entry Point: https://<windows-server-name-domain>/adfs/ls/

IDP SLO Redirect URL: https://<windows-server-name-domain>/adfs/ls/?wa=wsignout1.0
The Custom Issuer field is the federation metadata URL of your workspace appended with the Custom Provider value that you entered previously. Open this URL in a new tab to view the file contents. For example, the URL can look like this:
https://<your-rocket-chat-workspace>/_saml/metadata/test-adfsAdd the private key certificate related to the ADFS server. Note that ADFS uses
.pfxcertificate extensions (widely used on Windows landscapes) and Rocket.Chat uses.pemfiles. So, before setting the certificate here, it must be converted.Set the Custom Authn Context and User Data Field Map according to the configuration you have on your ADFS system.
Save your changes.
Configure ADFS server
In this section, we will configure the following:
Add relying party trust in the ADFS server.
Edit claims issuance policy in the ADFS server
User data mapping in the Rocket.Chat workspace.
Add relying party trust
In the ADFS server, we will add a relying party trust to establish the trust between the server and the workspace. This will allow users from the organization to access Rocket.Chat without using separate credentials. Here, we will import the federation metadata file and configure the settings as follows:
On the ADFS management screen, under Actions, click Add Relying Party Trust.
On the Welcome page, select Claims aware and click Start.
To select the data source, click Import data about the relying party published online or on a local network. In the Federation metadata address (host name or URL) field, enter the metadata URL you got from the Custom Issuer field in your workspace.
Click Next.
Enter a Display name and click Next.
Choose an access control policy as per your requirements. For this example, we will select Permit everyone. Click Next.
Now, you can review your settings and click Next.
Finish adding the relying party trust.
Edit claim issuance policy
Next, we will configure the claim issuance policy for the server. This determines what information is provided to the workspace after the user is authenticated. For this example, we will add four rules by following these steps:
In the ADFS management tool, under Actions, click Edit Claim Issuance Policy.
Click Add rule. Select the Claim rule template as Send LDAP Attributes as Claims and click Next.
Enter a Claim rule name, for example,
LDAP. Select the Attribute store as Active Directory.In the Mapping of LDAP attributes to outgoing claim types table, select the options as shown in the following screenshot and then click Finish:

Observe that the three Outgoing Claim Type values —
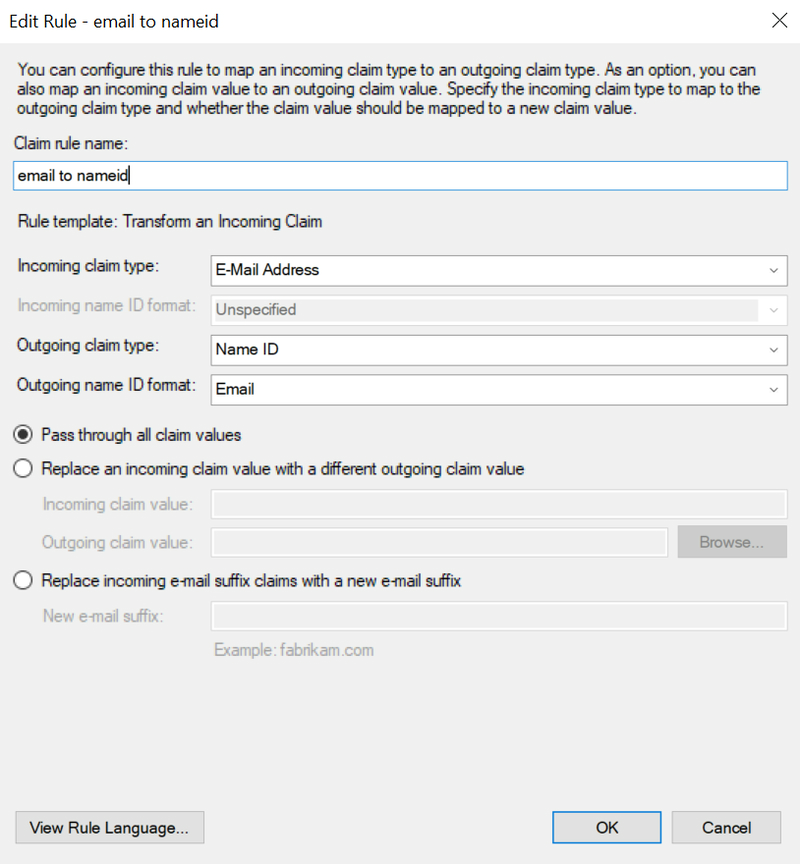
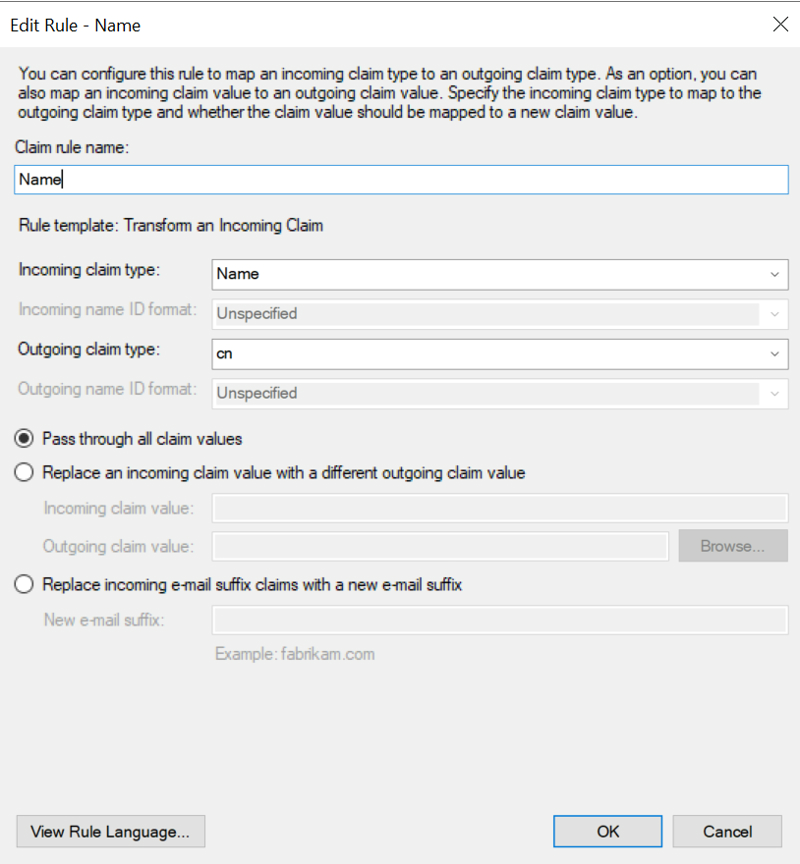
Name,E-Mail Address, andsamAccountNameare used for Incoming claim type fields in the remaining three rules.Let's add a second rule. Click Add rule and select the Rule template as Transform an Incoming Claim. Give it any name, provide the settings as shown in the following screenshot, and click Finish:

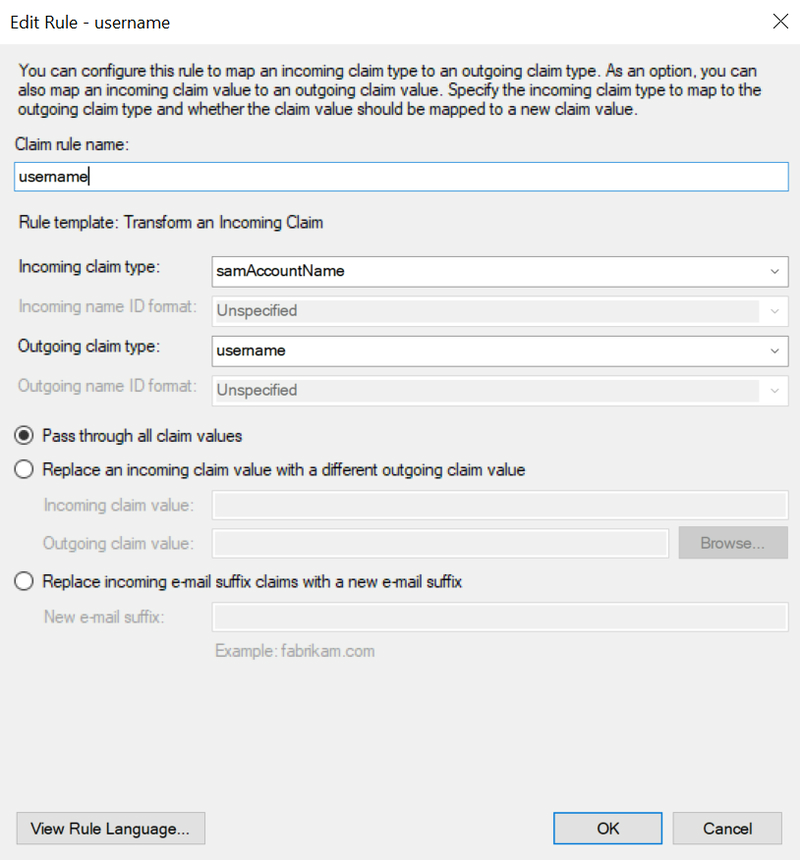
Again, click Add rule and select the Rule template as Transform an Incoming Claim. Give it any name, provide the settings as shown in the following screenshot, and click Finish:

For the fourth and final rule, add a rule as shown in the following screenshot:

Map user data
Now that you have completed configuring the claim issuance policy, go to the SAML settings in your Rocket.Chat workspace. In General > Mapping > User Data Field Map, enter the following mapping:
{
    "username":"username",
    "email":"email", "name":
    { "fieldName": "cn",
      "template": "__cn[0]__" }
}
This mapping reflects the claims issuance policy that we just defined.
Primary authentication
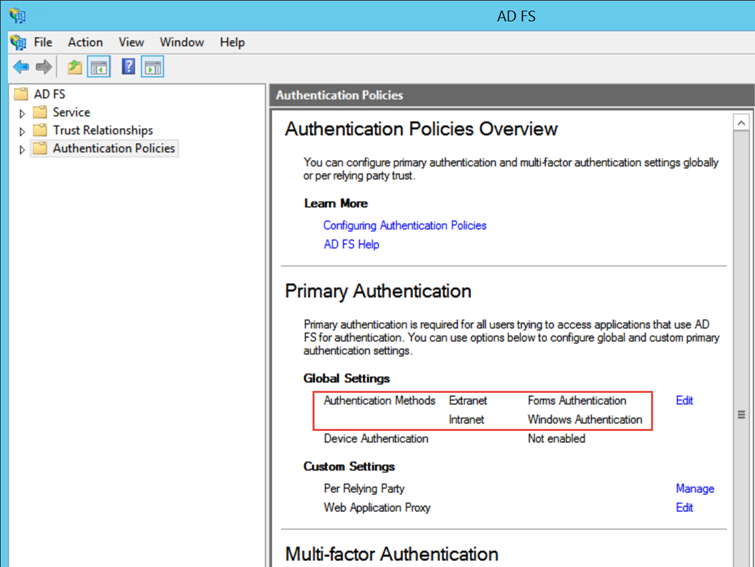
The Custom Authn Context field must match the authentication methods selected on ADFS. Microsoft Federation Services provides two authentication methods: Forms Authentication and Windows Authentication (Intranet).

Forms authentication: If this option is set as 'primary', a login form provided by ADFS will be called by the SAML assertion to perform the login operation.
For this method, the recommended Custom Authn Context in Rocket.Chat is
urn:oasis:names:tc:SAML:2.0:ac:classes:PasswordProtectedTransport
Windows authentication: If this option is set as 'primary', ADFS will expect the login assertions on the Windows Domain level (Intranet).
To set a full SSO scenario between Rocket.Chat and ADFS, the recommended Custom Authn Context is
urn:federation:authentication:windows. Make sure that the Identifer Format field value isurn:oasis:names:tc:SAML:1.1:nameid-format:unspecified.
Great — All your settings are now complete! You can use Rocket.Chat with your ADFS integration to maintain security, troubleshoot issues, and monitor authentication events.