Rocket.Chat offers a comprehensive set of features for team collaboration, allowing users to create and manage rooms tailored to their specific needs. These rooms come with various options that help manage and utilize them effectively.
This document guides you through the common room options for channels, teams, and discussions. For DM room options, see Manage Direct Messages.
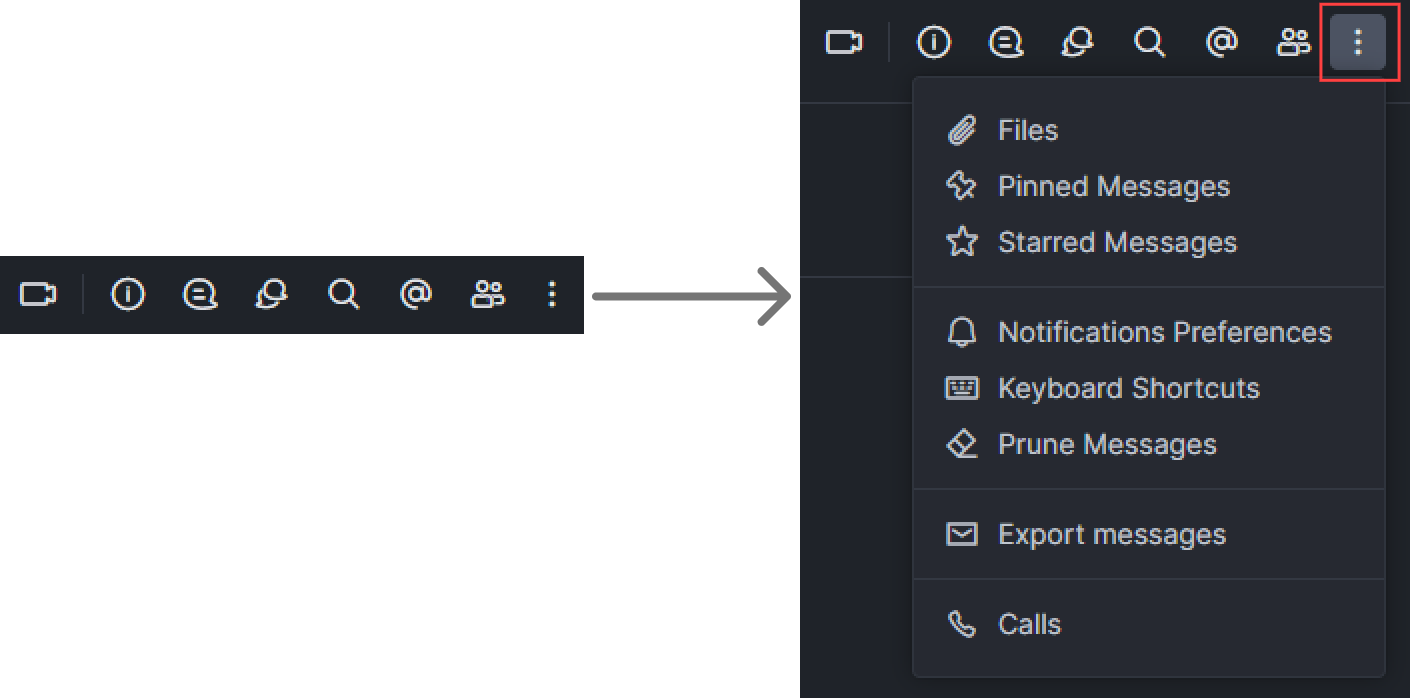
Room options are accessible from the menu bar. Click the kebab menu to view additional options. The list of options may differ according to the room type.
Let’s look at the key options available across rooms in Rocket.Chat.
View threads
Click the threads icon ![]() to view and participate in threads. This keeps related messages organized and allows you to focus on the most relevant conversations in the room. You can filter threads between All, Following, and Unread.
to view and participate in threads. This keeps related messages organized and allows you to focus on the most relevant conversations in the room. You can filter threads between All, Following, and Unread.
Tap the threads icon ![]() from the menu bar to view and participate in threads. This keeps related messages organized and allows you to focus on the most relevant conversations in the room. Tap the filter icon to filter threads between All, Following, and Unread, or use the search icon to search for specific messages.
from the menu bar to view and participate in threads. This keeps related messages organized and allows you to focus on the most relevant conversations in the room. Tap the filter icon to filter threads between All, Following, and Unread, or use the search icon to search for specific messages.
View discussions
Click the discussions icon ![]() to view and search for discussions in a room. This option is available in all rooms except discussions.
to view and search for discussions in a room. This option is available in all rooms except discussions.
Tap the room name for which you want to view discussions. Tap the Discussions to view and search for discussions in the room. This option is available in all rooms except discussions.
Search messages
Rocket.Chat search supports basic search commands, including the use of regular expressions. Regular expressions provide flexibility to search chat entries in any language, even those traditionally challenging, like "CJK" languages (Chinese, Japanese, Korean). Use the search icon ![]() in any room to search messages.
in any room to search messages.
Basic search commands
You can use the following commands before or after entering search terms in a room:
from:me- To search for messages only created by the current user.from:user.name -To search for messages created by a specific user. The username entered must be the format without spaces (i.e., "john.doe" and not "John Doe.") Search for any mentions of a user by searching for their username.has:star- Returns messages that the current user stars.is:pinnedorhas:pin- Returns messages that pin in the current room.has:urlorhas:link- Returns messages that contain a link.has:locationorhas:map-Returns messages that have a location attached.before:dd/mm/yyyy,after:dd/mm/yyyyandon:dd/mm/yyyy- Return message created before, after, or on the provided date. Dashesdd-mm-yyyyor dotsdd.mm.yyyycan be used instead of slashes.order:desc,order:descend, ororder:descending- Sorts messages by descending timestamp.
Select the Options icon of a message in the search result and click Jump to message to take you directly to the message.
Refer to these resources to learn more about regex(regular expressions).
View mentions
Click the mentions icon ![]() to view a list of all messages you've been mentioned in, ensuring you don't miss any important conversations.
to view a list of all messages you've been mentioned in, ensuring you don't miss any important conversations.
Tap the room name for which you want to view your mentions. Tap Mentions from the list of room options.
View pinned messages
The pinned messages option allows you to quickly access important messages that have been pinned within a room. Pinned messages are highlighted to ensure they are easily retrievable and viewable by all room members.
To view pinned messages in a room, follow these steps:
Click the kebab icon from the room menu bar.
Select Pinned Messages from the drop-down menu.
All pinned messages in the room are displayed on the right-hand side pane.
To view pinned messages in a room in the mobile app, follow these steps:
Tap the room name from the menu bar.
Tap the Pinned option from the list of room options.
The list of pinned messages is displayed for that room.
Refer to the Message actions guide to learn how to pin a message.
View starred messages
The starred messages option allows you to access messages you have marked as important by starring them. Starred messages help you keep track of critical information without pinning it for the entire room.
To view starred messages in a room, follow these steps:
Click the kebab icon from the room menu bar.
Select Starred Messages from the drop-down menu.
All your starred messages are displayed in the right-hand pane of the room.
To view starred messages in a room in the mobile app, follow these steps:
Tap the room name from the menu bar.
Tap the Starred option from the list of room options.
The list of starred messages is displayed for that room.
Refer to the Message actions guide to learn how to star a message.
Manage room notifications
Rocket.Chat allows you to update the notification preferences for any room you are a member of. By default, you receive notifications whenever someone mentions you or uses the @all mention in a room. Room notifications are sent only if the desktop or web client has been inactive for over five minutes. Changing your status to away does not reduce this period. Depending on the privacy settings configured by the administrator, notifications on your mobile device include the sender's name, room name, or the first line of the message.
To update the notification preferences for a room, follow these steps:
Click the kebab icon from the room menu bar.
Select Notification Preferences.
Enable Turn ON to receive notification alerts.
Update the following notification options:
Field | Description |
|---|---|
Mute @all and @here mentions | Mute alerts whenever you are mentioned in the channel. |
Mark As Unread | Display the room as unread when there are unread messages. |
Desktop | Control notification behavior for message alerts and the sound when using the desktop app or a browser. |
Mobile | Control push notification behavior for alerts when using the mobile app. |
Set the type of messages that send an email notification |
To update the notification preferences for a room in the mobile app, follow these steps:
Tap the room name from the menu bar.
Select Notifications from the list of room options.
Enable the option Receive notification if you want to receive notifications for that room.
Enable the option Receive group mentions to receive notifications when someone uses the
@alland@herementions.Enable the Mark unread option to display the room as unread when there are unread messages in that room.
You can set Alert and Sound options for in-app and desktop notifications, as well as the Alert option for mobile push notifications.
If you want to receive email notifications, set the Alert option under E-mail.
Select Troubleshooting to view the status of the device notification settings and the push gateway connection.
The alert options for desktop, mobile, or email notifications are: Default, All Messages, Mentions, and Nothing. Select your preferred option to specify which types of messages you want to receive alerts for.
These options provide flexibility in how you receive notifications, ensuring that you stay informed in a way that suits your preferences and work style.
Search files in a room
The Files option is particularly useful for finding documents, images, and other attachments shared in the room. This feature ensures that all files are easily retrievable and organized in one place.
To view files in a room, follow these steps:
Click the kebab icon from the room menu bar.
Select Files.
For DMs and discussions, click the attachment icon from the room header menu bar.
All the file attachments in the room are displayed, allowing you to filter by audio, video, files, and images.
To view files in a room in the mobile app, follow these steps:
Tap the room name from the menu bar.
Select Files from the list of room options.
All files shared within that room are displayed.
View keyboard shortcuts
You can maximize your efficiency with Rocket.Chat by using hotkeys. Click Keyboard Shortcuts to view the list.
Shortcut | Description |
|---|---|
| Open Room / User search |
| Clear all unread messages |
| Edit the previous message |
| Move to the beginning of the message |
| Move to the beginning of the message |
| Move to the end of the message |
| Move to the end of the message |
| New line in the message compose input |
| Bold |
| Italic |
| Copy |
| Paste |
| Cut |
Prune messages from a room
The Prune Messages option enables administrators and room owners to delete messages from a room swiftly based on specific criteria. It requires the clean-channel-history permission. This feature helps maintain a clean and relevant conversation history by removing unnecessary or outdated messages. Visit our Retention Policy guide to learn more about automated retention policies.
Pruned messages and files are deleted forever and cannot be recovered. You are advised to use this feature with caution.
To prune selected messages,
Click the kebab icon from the room menu bar.
Select Prune Messages and update the following fields:
Field
Description
Newer than
Deletes all messages posted after a particular date.
Older than
Deletes all messages posted before a particular date.
Only prune content from these users
Allows you to specify which user's message to delete. Leave empty to prune everyone’s messages.
Inclusive
Deletes all messages that were sent at the specified start and end times you have specified in the
Newer thanandOlder thanfields.Do not prune pinned messages
Do not delete pinned messages.
Do not prune discussion messages
Do not delete discussion messages.
Do not prune threads
Do not delete thread messages.
Only remove the attached files, keep message
If enabled, messages are not deleted, but files are. They are replaced by a
File removed by an automatic prunemessage. When used together with Exclude pinned messages, only unpinned files are deleted.
Once you’re done, click Prune.
Export messages
With the Export Messages feature, you can export the entire conversation history of a room or selected messages.
To export messages, follow these steps:
Click the kebab icon in the room menu bar.
Select Export Messages.
Select the export method and update the required fields. The export methods are as follows:
Send email
Method: Select Send email from the drop-down menu.
Output format: The HTML format is supported.
To Users: Select the users to send the email.
To additional emails: Add any additional email addresses that should receive the export email, separated by commas.
Subject: Provide a subject for the email.
Select the messages you want to export and click Send. The users will receive an email containing the selected exported messages.
Send file via email
Output format: The HTML and JSON formats are supported. Select the option you prefer.
From and to dates: Enter the dates for which you want the messages to be exported.
Click Send, and you will receive an email with the downloadable zip file.
Download messages
Method: Select Download from the drop-down menu.
Output Format: The JSON format is supported.
Select the messages you want to export and click Download.
If the room is encrypted, see how to export messages in the End-to-End Encryption User Guide.