.svg)
An air-gapped system is a computing environment that is physically isolated from external networks, including the public internet. This setup is commonly used by organizations with heightened security requirements, such as government agencies, defense sectors, and critical infrastructure operators.
Rocket.Chat supports deployment in air-gapped environments but requires a Starter or premium (Commercial, Government, Defense) license due to the following reasons:
Commercial code inclusion: Rocket.Chat’s codebase includes both open-source and commercial components. A premium license grants access to the full codebase with advanced features and allows organizations to audit the code for compliance.
Intellectual property protection: Without internet access, Rocket.Chat cannot verify license usage for commercial features. The premium license ensures compliance and protects Rocket.Chat’s intellectual property.
Access to premium features: A premium license is required to unlock all premium-grade features, including advanced security tools, scalability options, advanced customizations, and dedicated premium support channels.
For organizations using Community workspaces, there are two options:
Purchase a premium license: Upgrade to any premium plan to ensure compliance and unlock advanced features in your workspace. To upgrade to Starter, refer to Upgrade to Starter from Community workspace.
Build and maintain a FOSS version: For teams that prefer a fully open-source route, Rocket.Chat can be built directly from the Github repository without requiring a license. However, this option does not include access to any premium features, dedicated support, or commercial components.
Deploy an air-gapped Rocket.Chat workspace with Docker
This guide details two methods for deploying a Rocket.Chat workspace within an air-gapped environment using Docker. Choose the method that best aligns with your network and policy requirements:
Transfer required Docker images and configuration files from an internet-connected server.
Deploy with a private registry within the air-gapped network.
Option 1: Transfer required Docker images and configuration files from an internet-connected server
Given that an air-gapped environment has no internet access, this approach involves downloading all required Docker images and configuration files on a server with internet access, then manually transferring them to the air-gapped server for deployment.
Prerequisites
An internet-connected server with Git installed
An air-gapped server to deploy Rocket.Chat
Docker & Docker Compose (Docker Compose v2) installed on both servers
A secure method to transfer files between servers (e.g., USB drive, scp)
A TLS certificate and private key on the air-gapped server, if you are securing your workspace with HTTPS
Step 1: Configure Rocket.Chat
The official rocketchat-compose repository contains all the configuration files you need to successfully deploy Rocket.Chat using Docker Compose.
Complete the following steps on the internet-connected server.
Clone the repository and navigate into the cloned directory:
git clone --depth 1 https://github.com/RocketChat/rocketchat-compose.git
cd rocketchat-compose
This repository includes:
compose.yml: The main configuration file for Docker Compose to deploy Rocket.Chat..env.example: An example enviroment file for customizing your deployment.Additional configs: Other configuration files to support your deployment, such as database, Traefik (for reverse proxy and HTTPS) and monitoring tools.
Copy the provided example enviroment file:
cp .env.example .envThis command creates the
.envfile where you can now define your deployment variables, such as the desired Rocket.Chat version and your workspace URL.Open the file for editing:
nano .env
Work through the configuration sections below before saving. Each section covers a distinct area of your deployment.
1a. Set Rocket.Chat version
Locate the
RELEASEvariable and set it to exact version of Rocket.Chat you wish to deploy. A full list of available stable releases is on the Rocket.Chat releases page. For example, to set Rocket.Chat 7.5.0:RELEASE=7.5.0For production environments, it’s strongly recommended to specify a fixed version number (e.g., 7.5.0) instead of using
latest. This prevents unexpected issues from automatic, breaking updates.Set the
MONGODB_VERSIONvariable to the MongoDB version supported by your chosen Rocket.Chat release. Refer to the Rocket.Chat release notes to confirm compatibility.For example, to set Rocket.Chat 8.0:MONGODB_VERSION=8.0
1b. Configure monitoring
The repository includes a ready-to-use observability stack: Prometheus collects metrics, Loki aggregates logs, and Grafana provides a dashboard for visualizing both. This setup allows you to visualize key metrics, track performance, and gain insights into the health of your Rocket.Chat instance.
You can choose to access Grafana either through a URL path (e.g., https://your-domain.com/grafana) or a subdomain (e.g., https://grafana.your-domain.com).
This option is ideal for local development or single-domain setups, accessing your Grafana dashboard as a subdirectory (e.g., https://your-domain.com/grafana).
To configure this, follow these steps in the .env file:
You can use the default values for the following variables:
GRAFANA_DOMAIN: Leave this variable empty.GRAFANA_PATH: Set this to your desired path, ensuring there is no trailing slash (e.g.,/grafana).GRAFANA_DOMAIN= GRAFANA_PATH=/grafana
Set a strong password for the Grafana
adminuser by updating theGRAFANA_ADMIN_PASSWORDvariable:GRAFANA_ADMIN_PASSWORD=your_secure_password
After deployment, Grafana will be available at https://your-domain.com/grafana.
Accessing your Grafana dashboard through a dedicated subdomain is the recommended approach for production environments, as it provides a cleaner and more secure access point.
To set this up, follow these steps:
In your DNS settings, create an A record for your desired subdomain (e.g.,
grafana.your-domain.com) and point it to your server's public IP address.Configure the following Grafana variables in the
.env:GRAFANA_DOMAIN: Set this to the subdomain for accessing the Grafana dashboard. (e.g.,grafana.your-domain.com).GRAFANA_PATH: Leave this variable empty.GRAFANA_DOMAIN=grafana.your-domain.com GRAFANA_PATH=
Set a strong password for the Grafana
adminuser by updating theGRAFANA_ADMIN_PASSWORDvariable:GRAFANA_ADMIN_PASSWORD=your_secure_password
After deployment, Grafana will be available at https://grafana.your-domain.com .
1c. Configure domain and reverse proxy
Your reverse proxy determines how users access your workspace and whether connections are secured with HTTPS. The repository ships with Traefik as the default and recommended reverse proxy.
If you are only testing Rocket.Chat locally on your machine and do not require external access or HTTPS, use the default values for these variables in the .env :
DOMAIN=localhost
ROOT_URL=http://localhost
Your workspace will be accessible at http://localhost:3000 once succesfully deployed.
Before proceeding, verify that your domain's A record (or optional CNAME record) is correctly pointed to the public IP address of the server where you are running Docker.
For a publicly accessible and secure production deployment, update the following variables in your .env file:
Field | Description | Example |
|---|---|---|
DOMAIN | Your public domain. Do not include https:// or any trailing slashes. | example.com |
ROOT_URL | The complete URL your users will use to access the server, including the secure protocol (https://). | https://example.com |
LETSENCRYPT_ENABLED | Set to | false |
LETSENCRYPT_EMAIL | Your valid email address for certificate renewal and security notifications from Let's Encrypt. | demo@email.com |
TRAEFIK_PROTOCOL | Set to | https |
Here is an example of the configuration:
DOMAIN=example.com
ROOT_URL=https://example.com
LETSENCRYPT_ENABLED=false
LETSENCRYPT_EMAIL=demo@email.com
TRAEFIK_PROTOCOL=https
1d. Configure manual certificate and key for HTTPS
If you are securing your deployment with HTTPS, make your TLS certificate and private key available to Traefik. The compose.manual-cert.traefik.yml file expects the following files:
fullchain.pemprivkey.pem
By default, these files are loaded from /etc/traefik/certs .
If your certificates are stored in a different location on the airgapped server, either move them to /etc/traefik/certs or update the volume mount in compose.manual-cert.traefik.yml to point to the directory containing your certificate files. For example:
- /your/custom/path:/certs:ro Do not modify /certs:ro.
Step 2: Download the required Docker images
With your deployment configuration defined, download the required Docker images on the internet-connected server.
From the
rocketchat-composedirectory, pull all required images:docker compose -f compose.database.yml -f compose.monitoring.yml -f compose.manual-cert.traefik.yml -f compose.yml -f docker.yml pullVerify the downloaded images:
docker imagesPackage all images into a
.tararchive:docker save $(docker compose -f compose.database.yml -f compose.monitoring.yml -f compose.manual-cert.traefik.yml -f compose.yml config --images) -o all-images.tar
Confirm the archive was created successfully:
lsYou should see
all-images.taralongside the Compose files in therocketchat-composedirectory.
Step 3: Transfer the files to the airgapped server
With your configuration and images prepared, transfer them to the air-gapped server.
If the servers cannot communicate directly:
Copy the
rocketchat-composedirectory to a USB drive and transfer them manually to the air-gapped server.
If the servers can communicate over a network:
Transfer the directory with
scpusing this command:
scp -r -i <key> rocketchat-compose <user_name@target_ip_address:/destination_path>Replace the following with the appropriate values:
key: The key to access the air-gapped server where the file should be sent.user_name@target_ip_address: The username and IP address of the air-gapped server where the file should be sent.destination_path: The directory path on the air-gapped server where you want to save the file.
For example, scp -i firstServer.pem rocketchat-compose.tar ubuntu@176.37.27.133:/home/ubuntu .
Step 4: Deploy Rocket.Chat on the air-gapped server
On the air-gapped server, navigate to the transfer destination and complete the following steps.
Confirm that the transfered directory contains
all-images.tar, the configuration files, and.env.cd rocketchat-compose lsLoad the Docker images:
docker load -i all-images.tarVerify that the images loaded successfully:
docker imagesDeploy and start all containers in the background:
docker compose -f compose.database.yml -f compose.monitoring.yml -f compose.manual-cert.traefik.yml -f compose.yml -f docker.yml up -dHere’s a brief summary of what each file in the command does:
File
Description
compose.yml
Launches the Rocket.Chat application
compose.database.yml
Manages MongoDB, the database that Rocket.Chat relies on. It also includes NATS, an internal message broker used for communication between services.
compose.monitoring.yml
Enables Prometheus and Grafana monitoring
compose.manual-cert.traefik.yml
Manages Traefik as the reverse proxy using a manually provided TLS certificate.
You can easily customize your deployment by including only the services you need. For example, if you did not configure monitoring or Traefik, you can omit those.ymlfiles:docker compose -f compose.database.yml -f compose.yml up -dTo check that all services have successfully started, use this command to list all running containers:
docker ps -aAll services should show a status of
Up. Some minor MongoDB containers may showExited (0), which is expected.To see the log/status of your Rocket.Chat container, execute this command:
docker compose logs -f rocketchat
.png "image(73).png")
The log output includes your Site URL where users can access your workspace on the browser.
Step 5: Access your Rocket.Chat workspace
Once your Rocket.Chat instance is deployed, you can access the workspace through your web browser to begin your final configuration:
For local deployment: Go to
http://localhost:3000.For production: Navigate to the domain you configured.
On first load, a setup wizard prompts you to create your first admin user and complete the initial workspace setup.
Access monitoring dashboard
You can access the Grafana dashboard via the URL corresponding to your configured access method:
Via path:
https://your-domain.com/grafanaVia subdomain:
https://grafana.your-domain.com
Sign in with the following credentials:
User:
adminPassword: The password you set in the
GRAFANA_ADMIN_PASSWORDvariable in your.envfile.The
GRAFANA_ADMIN_PASSWORDyou set in the.envfile is only applied once during the first setup of the container. To update your password later, you must change it directly within your Grafana user preferences.
For more details on how to monitor your workspace metrics and logs, refer to the Monitor Workspace Logs and Metrics guide.
Continue to the Next steps section for directions on workspace registration and license.
Option 2: Deploy Rocket.Chat with a private Docker registry
A Docker registry is a system for storing and distributing Docker images with specific names. This approach demonstrates how to use a private Docker registry hosted within your air-gapped network to store and distribute the necessary Docker images for deploying Rocket.Chat.
Prerequisites
One internet-connected server with Git installed to download and push images to your private registry
One air-gapped server to host the private registry
One air-gapped server to deploy Rocket.Chat
Docker and Docker Compose (Docker Compose v2) installed on all servers
A TLS certificate and private key on the air-gapped server, if you are securing your workspace with HTTPS
The diagram below highlights an overview of the servers:
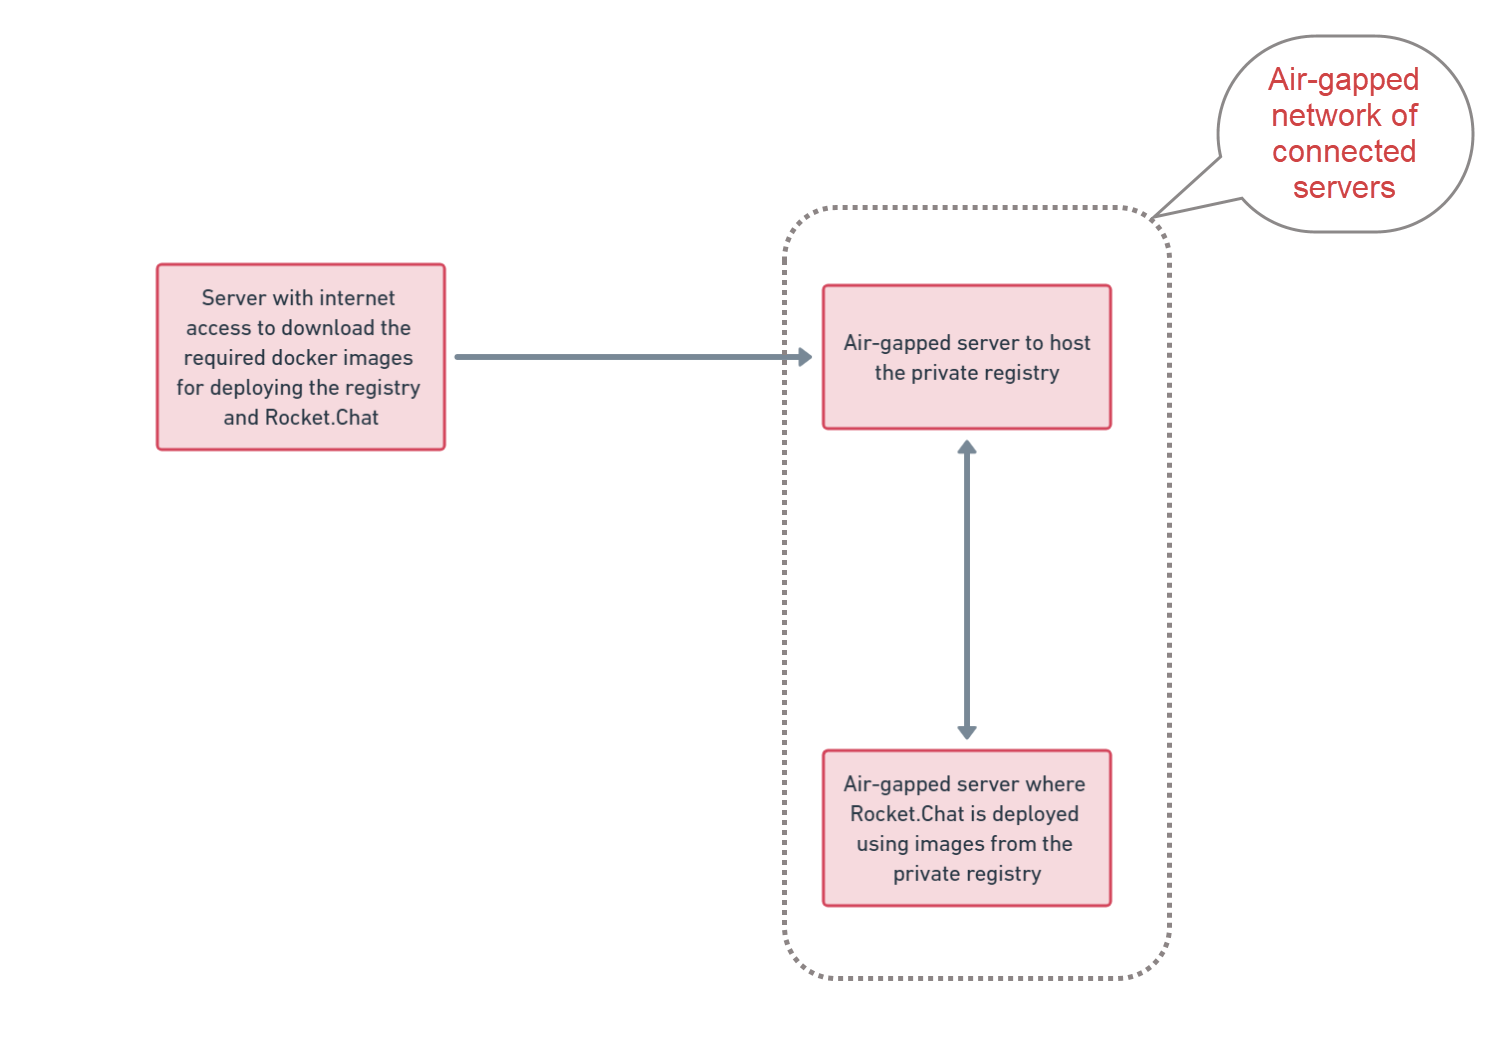
Air-gapped deployment with private registry servers
Step 1: Set up private registry
Because the registry host server has no internet access, Docker images cannot be pulled directly from Docker Hub. You must first download the registry image on the internet-connected server and transfer it to the air-gapped registry host.
1a. Fetch the private registry image
On the internet-connected server, pull the registry image:
docker pull registry:2Verify that the image has been downloaded:
docker images.png "image(68).png")
Save the image to a
.tarfile:docker save -o registry_image.tar registry:2Transfer the
registry_image.tarfile to the first air-gapped server for hosting the registry:scp -i [key] registry_image.tar <user_name@target_ip_address:/destination_path>Update the following with the appropriate values:
key: The key to access the registry host server where the file should be sent.user_name@target_ip_address: The username and IP address of the registry host server where the file should be sent.destination_path: The directory path on the registry host server where the file should be located.
For example:
scp -i firstServer.pem registry_image.tar ubuntu@172.31.81.10:/home/ubuntuTransfer methods may vary depending on your company's policies and network configurations. If your server with internet access and the air-gapped server cannot communicate and are not on the same network, transfer the file using a USB drive.
1b. Create the private registry container
On the air-gapped server designated as the registry host where you pushed the registry_image.tar, complete the following steps.
Navigate to the destination path and confirm the file transfer was successful:
lsLoad the
.tarfile:docker load -i registry_image.tarVerify the image is available:
.png "image(69).png")
Start the registry container:
docker run -d -p 5000:5000 --restart=always --name private-registry registry:2It's not mandatory to run the container on port 5000. The suggested port is an example and can be updated according to your specific requirements.
Update
private-registrywith your preferred name for the registry container.For production environments, ensure the persistence of images by either specifying a local folder on the host for storage or by implementing other suitable persistence mechanisms.
Confirm the registry container is running:
docker ps.png "image(70).png")
Your private registry is now operational and ready to receive Docker images.
Step 2: Configure Rocket.Chat
The official rocketchat-compose repository contains all the configuration files you need to successfully deploy Rocket.Chat using Docker Compose. Complete the following steps on the internet-connected server:
Clone the repository using Git and navigate to the cloned directory:
git clone --depth 1 https://github.com/RocketChat/rocketchat-compose.git
cd rocketchat-compose
This repository includes:
compose.yml: The main configuration file for Docker Compose to deploy Rocket.Chat..env.example: An example enviroment file for customizing your deployment.Additional configs: Other configuration files to support your deployment, such as database, Traefik (for reverse proxy and HTTPS) and monitoring tools.
Copy the provided example enviroment file:
cp .env.example .envThis command creates the
.envfile where you can now define your deployment variables, such as the desired Rocket.Chat version and your workspace URL.Open the file for editing:
nano .env
Work through the configuration sections below before saving. Each section covers a distinct area of your deployment.
2a. Set Rocket.Chat version
Locate the
RELEASEvariable and set it to exact version of Rocket.Chat you wish to deploy. A full list of available stable releases is on the Rocket.Chat releases page. For example, to set Rocket.Chat 7.5.0:RELEASE=7.5.0For production environments, it’s strongly recommended to specify a fixed version number (e.g., 7.5.0) instead of using
latest. This prevents unexpected issues from automatic, breaking updates.Set the
MONGODB_VERSIONvariable to the supported MongoDB version for your Rocket.Chat release. Check the Rocket.Chat release notes to ensure you are using the version supported by your specific release.
2b. Configure monitoring
The repository includes a ready-to-use observability stack: Prometheus collects metrics, Loki aggregates logs, and Grafana provides a dashboard for visualizing both. This setup allows you to visualize key metrics, track performance, and gain insights into the health of your Rocket.Chat instance.
You can choose to access Grafana either through a URL path (e.g., https://your-domain.com/grafana) or a subdomain (e.g., https://grafana.your-domain.com).
This option is ideal for local development or single-domain setups, accessing your Grafana dashboard as a subdirectory (e.g., https://your-domain.com/grafana).
To configure this, follow these steps in the .env file:
You can use the default values for the following variables:
GRAFANA_DOMAIN: Leave this variable empty.GRAFANA_PATH: Set this to your desired path, ensuring there is no trailing slash (e.g.,/grafana).GRAFANA_DOMAIN= GRAFANA_PATH=/grafana
Set a strong password for the Grafana
adminuser by updating theGRAFANA_ADMIN_PASSWORDvariable:GRAFANA_ADMIN_PASSWORD=your_secure_password
After deployment, Grafana will be available at https://your-domain.com/grafana.
Accessing your Grafana dashboard through a dedicated subdomain is the recommended approach for production environments, as it provides a cleaner and more secure access point.
To set this up, follow these steps:
In your DNS settings, create an A record for your desired subdomain (e.g.,
grafana.your-domain.com) and point it to your server's public IP address.Configure the following Grafana variables in the
.env:GRAFANA_DOMAIN: Set this to the subdomain for accessing the Grafana dashboard. (e.g.,grafana.your-domain.com).GRAFANA_PATH: Leave this variable empty.GRAFANA_DOMAIN=grafana.your-domain.com GRAFANA_PATH=
Set a strong password for the Grafana
adminuser by updating theGRAFANA_ADMIN_PASSWORDvariable:GRAFANA_ADMIN_PASSWORD=your_secure_password
After deployment, Grafana will be available at https://grafana.your-domain.com .
2c. Configure domain and reverse proxy
Your reverse proxy determines how users access your workspace and whether connections are secured with HTTPS. The repository ships with Traefik as the default and recommended reverse proxy.
If you are only testing Rocket.Chat locally on your machine and do not require external access or HTTPS, use the default values for these variables in the .env :
DOMAIN=localhost
ROOT_URL=http://localhost
Your workspace will be accessible at http://localhost:3000 once succesfully deployed.
Before proceeding, verify that your domain's A record (or optional CNAME record) is correctly pointed to the public IP address of the server where you are running Docker. Traefik cannot provision a certificate for a domain it cannot reach.
For a publicly accessible and secure production deployment, update the following variables in your .env file:
Field | Description | Example |
|---|---|---|
DOMAIN | Your public domain. Do not include https:// or any trailing slashes. | example.com |
ROOT_URL | The complete URL your users will use to access the server, including the secure protocol (https://). | https://example.com |
LETSENCRYPT_ENABLED | Set to | false |
TRAEFIK_PROTOCOL | Set to | https |
Here is an example of the configuration:
DOMAIN=example.com
ROOT_URL=https://example.com
LETSENCRYPT_ENABLED=false
TRAEFIK_PROTOCOL=https
1d. Configure manual certificate and key for HTTPS
If you are securing your deployment with HTTPS, make your TLS certificate and private key available to Traefik. The compose.manual-cert.traefik.yml file expects the following files:
fullchain.pemprivkey.pem
By default, these files are loaded from /etc/traefik/certs .
If your certificates are stored in a different location on the airgapped server, either move them to /etc/traefik/certs or update the volume mount in compose.manual-cert.traefik.yml to point to the directory containing your certificate files. For example:
- /your/custom/path:/certs:ro Do not modify /certs:ro.
Step 3: Transfer the required images and configurations
With your workspace configuration defined, pull the required Docker images on the internet-connected server and push them to the air-gapped private registry.
Pull all the required docker images for your deployment:
docker compose -f compose.database.yml -f compose.monitoring.yml -f compose.manual-cert.traefik.yml -f compose.yml -f docker.yml pullYou can verify the downloaded images by running
docker images.Tag the images for your private registry:
for image in $(docker compose -f compose.database.yml -f compose.monitoring.yml -f compose.manual-cert.traefik.yml -f compose.yml -f docker.yml config --images); do
  docker tag $image <registry_ip_address>:5000/$image
done
Replace
<registry_ip_address:5000>with the IP address of your registry host server and the appropriate port number, if your registry container is not running on port 5000.Verify the tagged images appear correctly:
docker imagesIf your registry uses HTTP, allow insecure access before pushing:
sudo mkdir -p /etc/docker
echo '{ "insecure-registries": ["<registry_ip_address>:5000"] }' | sudo tee /etc/docker/daemon.json
sudo systemctl restart docker
Replace
<registry_ip_address:5000>accordingly.Push all the tagged images to the air-gapped registry:
for image in $(docker compose -f compose.database.yml -f compose.monitoring.yml -f compose.manual-cert.traefik.yml -f compose.yml -f docker.yml config --images); do
  docker push <registry_ip_address>:5000/$image
done
Replace
<registry_ip_address:5000>accordingly. Once completed, your private registry will hold all the images needed to deploy Rocket.Chat.Transfer the
rocketchat-composedirectory to the second air-gapped server where Rocket.Chat will be deployed:scp -r -i [key] rocketchat-compose <user_name@target_ip_address:/destination_path>Update the following with the appropriate values:
key: The key to access the server where the rocketchat-compose directory should be sent.user_name@target_ip_address: The username and IP address of the second air-gapped server where Rocket.Chat willl be deployed.destination_path: The directory path on the registry host server where the file should be located.
For examaple:
scp -r -i "general.pem" rocketchat-compose ubuntu@172.31.81.10:/home/ubuntuStep 4: Update compose files to point to your private registry
Go to the second air-gapped server where Rocket.Chat will be deployed and continue with these steps:
If your registry uses HTTP, configure insecure registry access:
sudo mkdir -p /etc/docker
echo '{ "insecure-registries": ["<registry_ip_address>:5000"] }' | sudo tee /etc/docker/daemon.json
sudo systemctl restart docker
Replace
<registry_ip_address:5000>with the IP address of your registry host server and the appropriate port number, if your registry container is not running on port 5000.From inside the
rocketchat-composedirectory, run the following script to rewrite all image references:REGISTRY="<registry_ip_address>:5000" # compose.manual-cert.traefik.yml sed -i "s|docker.io/alpine|$REGISTRY/docker.io/alpine|g" compose.manual-cert.traefik.yml sed -i "s|docker.io/traefik|$REGISTRY/docker.io/traefik|g" compose.manual-cert.traefik.yml # compose.monitoring.yml sed -i "s|docker.io/grafana/grafana|$REGISTRY/docker.io/grafana/grafana|g" compose.monitoring.yml sed -i "s|docker.io/grafana/loki|$REGISTRY/docker.io/grafana/loki|g" compose.monitoring.yml sed -i "s|docker.io/otel/opentelemetry-collector-contrib|$REGISTRY/docker.io/otel/opentelemetry-collector-contrib|g" compose.monitoring.yml sed -i "s|docker.io/prom/node-exporter|$REGISTRY/docker.io/prom/node-exporter|g" compose.monitoring.yml sed -i "s|docker.io/prom/prometheus|$REGISTRY/docker.io/prom/prometheus|g" compose.monitoring.yml # compose.database.yml sed -i "s|docker.io/mongodb/mongodb-community-server|$REGISTRY/docker.io/mongodb/mongodb-community-server|g" compose.database.yml sed -i "s|docker.io/nats|$REGISTRY/docker.io/nats|g" compose.database.yml sed -i "s|docker.io/natsio/prometheus-nats-exporter|$REGISTRY/docker.io/natsio/prometheus-nats-exporter|g" compose.database.yml sed -i "s|docker.io/percona/mongodb_exporter|$REGISTRY/docker.io/percona/mongodb_exporter|g" compose.database.yml # compose.yml sed -i "s|registry.rocket.chat/rocketchat/rocket.chat|$REGISTRY/registry.rocket.chat/rocketchat/rocket.chat|g" compose.ymlReplace
<registry_ip_address:5000>with the IP address of your registry host server and the appropriate port number, if your registry container is not running on port 5000.Verify that all image paths have been updated correctly:
grep -r "image:" compose.yml compose.database.yml compose.monitoring.yml compose.manual-cert.traefik.ymlEvery image path in the output should now begin with your registry address. Once confirmed, proceed to deploy Rocket.Chat.
Step 5: Deploy Rocket.Chat from the private registry
Run the deployment as usual, but the images will now pull from your private registry instead of Docker Hub. Start the services:
docker compose -f compose.database.yml -f compose.monitoring.yml -f compose.manual-cert.traefik.yml -f compose.yml -f docker.yml up -dVerify containers are running:
docker psCheck Rocket.Chat logs:
docker compose logs -f rocketchatIt should display an output like this with your site URL, which you can use to access your workspace.
.png "image(72).png")
Congratulations, you have successfully deployed Rocket.Chat in your air-gapped environment.
Step 6: Access your Rocket.Chat workspace
Once your Rocket.Chat instance is deployed, you can access the workspace through your web browser to begin your final configuration:
For local deployment: Go to
http://localhost:3000.For production: Navigate to the domain you configured.
On first load, a setup wizard prompts you to create your first admin user and complete the initial workspace setup.
Access monitoring dashboard
You can access the Grafana dashboard via the URL corresponding to your configured access method:
Via path:
https://your-domain.com/grafanaVia subdomain:
https://grafana.your-domain.com
Sign in with the following credentials:
User:
adminPassword: The password you set in the
GRAFANA_ADMIN_PASSWORDvariable in your.envfile.The
GRAFANA_ADMIN_PASSWORDyou set in the.envfile is only applied once during the first setup of the container. To update your password later, you must change it directly within your Grafana user preferences.
For more details on how to monitor your workspace metrics and logs, refer to the Monitor Workspace Logs and Metrics guide.
Next steps
Once your air-gapped workspace is deployed successfully,
Register your workspace following the Air-Gapped Workspace Registration guide.
Apply the workspace license to unlock premium features.
Congratulations, you are ready to begin using your workspace! You can also refer to Air-Gapped Workspace Configuration for making additional configurations to your workspace.
To learn more about your workspace, you can refer to the following:
User Guides: Learn the basics of your Rocket.Chat account, the types of rooms, and how to communicate with your workspace users.
Workspace Administration: Administrators and owners can set and manage various configurations.
Upgrade from Community air-gapped workspace to Starter
From 7.0, air-gapped Community workspaces will be in read-only mode. Community workspaces must be subscribed to a premium plan to access the air-gapped features. Workspace admins can follow these steps to upgrade the workspaces:
Log in to the Rocket.Chat Cloud portal and select the Workspaces tab.
Click the kebab menu against the Community workspace that you want to upgrade.
Select Upgrade to Starter. Your workspace will be subscribed to the Starter plan.
Once your workspace is on Starter, follow these steps to get the air-gapped license and activate the workspace:
In the cloud portal, select the upgraded workspace. The workspace details page opens.
Click the Get License button from the Rocket.Chat License section.
An Apply Offline License pop-up opens. Copy the License Code.
In your workspace, go to Manage
 > Workspace > Settings > Premium.
Paste the license code you copied from the cloud porta in the Premium License field.
Save the changes.
You have successfully activated your air-gapped workspace! For other premium plans, you can refer to the Air-Gapped License document.